How to Make Sublimation Tumblers: A Step-by-Step Guide
In December 2023, Stanley™ cups went viral. The luxury mug brand rocketed into the spotlight when a video showed its iconic insulated tumbler was keeping a TikToker’s drink ice cold—right after she pulled it from her burning car!
The brand’s time in the spotlight may have passed, but tumblers are as popular as ever. To get in on the fun, we’re exploring how to use sublimation to make a unique tumbler of your own.
Discover how students can use sublimation to transform unique designs into fun, useful accessories!
Gear and Materials
To start sublimation printing on containers, you’ll need a sublimation printer, a heat pressing machine, and a few supplies.
We recommend our Sublimation Printer: All-In-One Printing Machine. It’s built with classrooms in mind, designed to empower students at different skill-levels.
We also recommend choosing from a wide range of heat press options, to best meet your class’s needs. Just make sure your heat press machine comes with a tumbler-compatible attachment or add-on.
Additional Materials:
- Heat tape
- Heat-resistant gloves
- Scissors
- Measuring tape
- Scraper
- Rubbing alcohol
- Cloth
- Sublimation paper
- Sublimation ink
- Design software
- Scanner (optional)
Select Blank Sublimation Tumblers
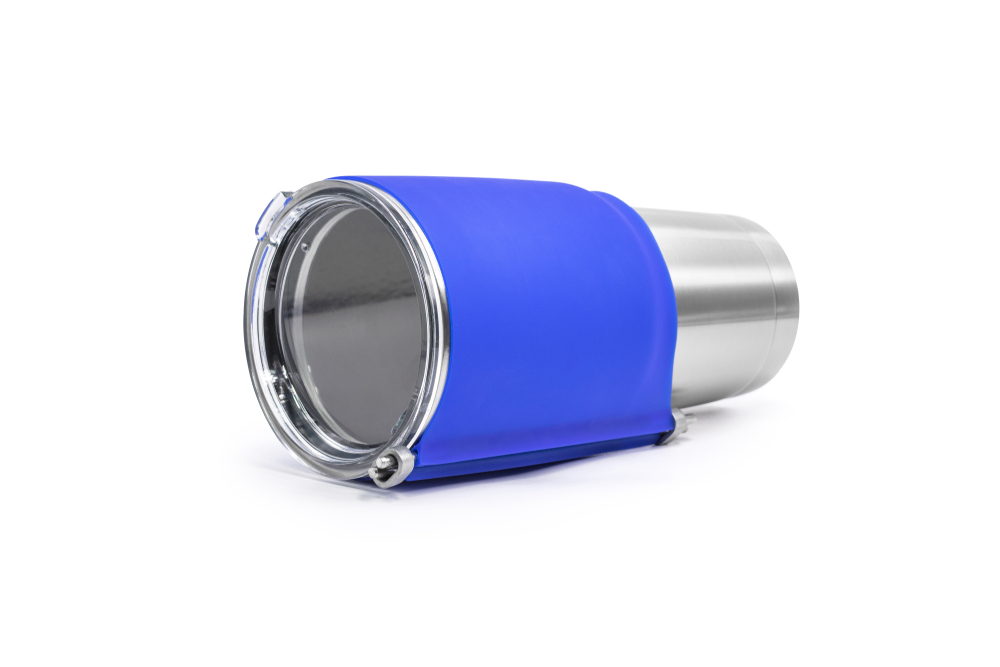
Choose blank cups with surfaces coated with a sublimation-compatible material (like polymer). The coating is necessary to meld sublimation ink into the object’s surface.
One popular tumbler material is stainless steel, as it’s durable and dishwasher-safe. For example, this lidded, 22 oz travel cup is strong, lightweight, and 100% compatible with sublimation.
Choose a white, light-hue, or translucent blank.
Translucent elements, like the frosted blue gradient on this glass tumbler blank, adds a bit of pizzazz to the piece without affecting your printed design.
Step #1. Discover How To Make Sublimation Designs For Tumblers (With Creative Apps!)
Measure the height and circumference of your tumbler’s print-ready surface.
Make a design for your tumbler on an app, or download a free design from crafters on Pinterest.
You’ll likely have to crop your design, so the design’s most important elements should be in the vertical center of the image.
Make sure to save your completed design as a PNG file, with a resolution of 300 dpi or greater.
Before printing, resize your image so its height and width match the cup’ height and circumference (respectively).
Step #2. Print Your Design Onto Sublimation Paper
Use the tumbler’s measurements to select appropriately-sized sublimation paper for this project.
Load your sublimation paper into your printer, then send the file and print. If you get stuck, call the printer manufacturer’s customer support line.
Step #3. Preheat Your Heat Press To the Ideal Temperature
The optimal temperature (°F), duration (s), and degree of pressure (psi) will vary by material.
Check the printed instructions included with your sublimation blanks (i.e. the blank tumblers) to find the right presets.
If you can’t find the information in the included technical paperwork, look for it on the tumbler manufacturer’s website, or call the customer service line.
As a last resort, use a trial-and-error method to determine the right settings. Run a few test prints, starting with these settings:
Stainless steel: 365 °F / 90-120 s / 40 psi (med.)
Frosted glass: 370-380 °F / 90-120 s / 35 psi (light or med)
Acrylic: 385-400 °F / 50-75 s / 40 psi (med)
Start with the lowest recommended settings. If the print is too light or blurry, increase the temperature, pressure, and time in small increments, then try again.
Repeat until the image on the test tumbler is sharp and saturated.
Step #4. Prepare Your Print and Blank Tumbler For Heat Transfer
As the press preheats, prepare your tumbler.
Peel any protective coatings from your blank tumblers, then clean the cup’s surface. Rub off the adhesive, dust, and any other debris with your cleaning alcohol and cloth.
Use your measurements to crop or trim your sublimation print, then gently wrap it around your tumbler. Make sure the inked side of the print touches the cup’s surface.
Use your hands to flatten the paper, removing any wrinkles or bubbles. Then, after the print is smoothly aligned to the cup, use heat tape to hold it in place.
Step #5. Press Your Sublimation Print and Tumbler
Put on your heat-resistant gloves. The heat press machine will be hot.
Then, put your print-wrapped cup into the tumbler attachment on the heat press and secure it in place.
Adjust the pressure settings to the recommended psi. This can involve manually adjusting tension in the tumbler attachment, to make sure the pressure is evenly distributed.
Then, press your tumbler for the recommended amount of time.
Note:
If your machine doesn’t heat your tumbler evenly, open the attachment after you press it, rotate the tumbler, then press it again.
Step #6. Let Your Tumbler Cool, Then Peel
While wearing heat gloves, move the tumbler to a cooling rack. Once it’s cooled, peel off the heat tape and sublimation paper.
Unique Ways To Use Sublimation Printed Tumblers In Your Classroom
What’s the best way to use sublimation printed tumblers in your classroom? We’ve got some ideas!
Students can keep their personal cups with them all day. This lets them stay hydrated without risking the spread of germs.
Students could also give them away as gifts. As the Stanley™ cup craze showed, tumblers are pretty popular!
Teaching budding entrepreneurs? Students could design tumblers to sell at a craft fair, or sell their accessory-printing services to local businesses.
Get Your Print Lab Kids Ready To Create, Sublimate, Educate and Go!
At AGC Education, we believe technology and art have the power to teach students lifelong skills. That’s why we offer guides like this: to teach each and every kid (and kid at heart) to make real what they’ve dreamed up.
Whether you need sublimation printers, heat presses, or accessories, our team has something to offer.
Call us today at 1 (800) 535-7553 to learn more about bringing our creative technology to your classroom. Or, fill out our online contact form, and one of our experts will get right back to you.