Best 3D Printer for Elementary Schools
Chris Ly on March 11, 2026

Choosing the best 3D printer for elementary schools requires more than comparing technical specifications. District leaders and educators must consider safety, ease of use, curriculum alignment, and long term support. Elementary classrooms demand equipment that is reliable, student safe, and simple for teachers to manage without adding complexity to their day.
At AGC Education, we help K to 12 schools implement turnkey 3D printing solutions designed specifically for younger learners. Our approach prioritizes safety, accessibility, and instructional impact while minimizing barriers for staff and IT teams.
What Makes a 3D Printer Ideal for Elementary Schools
Safety First
The best 3D printer for elementary schools features a fully enclosed design, filtered airflow, and child safe materials such as PLA filament. Enclosures protect curious hands from moving parts while maintaining a controlled printing environment. Clear safety protocols and classroom ready features are essential for peace of mind.
Ease of Use for Teachers
Elementary educators need intuitive software and straightforward setup. The ideal printer includes simple touchscreen controls, reliable automatic bed leveling, and minimal calibration requirements. When teachers can operate the printer confidently, it becomes a teaching tool rather than a technical obstacle.
Quiet and Classroom Friendly Operation
Elementary classrooms are dynamic learning environments. A printer that operates quietly and consistently supports instruction without disrupting lessons.
Quiet and Classroom Friendly Operation
3D printing in elementary schools builds foundational skills in problem solving, design thinking, and collaboration. Students can create geometric shapes to understand math concepts, design simple engineering models, or produce art projects that combine creativity with technology.
When aligned with curriculum standards, 3D printing strengthens STEM education while encouraging curiosity. The best 3D printer for elementary schools integrates seamlessly into science, technology, engineering, art, and math programs.
Why Turnkey Implementation Matters
A successful program goes beyond hardware. Schools benefit from:
Professional Development
Hands on training empowers teachers to integrate 3D printing into lesson plans with confidence.
Ongoing Technical Support
Reliable support reduces downtime and protects instructional time.
Curriculum Resources
Ready to use lesson materials accelerate adoption and ensure meaningful learning outcomes.
AGC Education partners with district leaders, technology coordinators, and STEM educators to deliver comprehensive solutions that simplify procurement and implementation. Our programs are designed to scale with your district while supporting classroom success from day one.


Making a Smart Investment
The best 3D printer for elementary schools balances durability, safety, and instructional value. When paired with professional development and ongoing support, 3D printing becomes a powerful tool that enhances engagement and builds essential skills at an early age.
By choosing a partner focused on education, schools reduce implementation barriers and create sustainable, impactful programs.
Frequently Asked Questions
The best option is an enclosed, easy to use printer designed for classroom safety and reliability, supported by training and curriculum resources.
Yes, when schools select enclosed systems with proper safety features and use recommended materials.
Structured professional development helps educators integrate 3D printing effectively and confidently.
Elementary 3D printing supports math, science, art, engineering, and interdisciplinary project based learning.
Districts often use STEM grants, technology budgets, and phased implementation plans to support adoption.
Best 3D Printer for Elementary Schools: Turnkey Solutions That Actually Work in Classrooms
If you are choosing the best 3D printer for elementary schools, you must balance safety, budget, and busy teachers. The ideal printer for beginners arrives assembled, with auto leveling, a quiet fully enclosed design, friendly software, and easy setup so students start 3D printing projects fast. Printers for kids must be safer, not just cheaper, with an enclosed build volume, a protected nozzle, filtration, and a simple touchscreen or wifi. Flashforge Adventurer and MakerBot Sketch Classroom offer reliability, US support, and classroom ready features. Request our free buyer’s guide for tailored recommendations, specs, pricing, and curriculum aligned options.
Why choosing the best 3D printer for elementary schools is different from other buying decisions
Choosing the best 3D printer for elementary schools is less about specs on a page and more about what happens in a real classroom at 9:15 a.m. with 24 curious students watching. You are not just buying hardware. You are choosing a system that has to be safe, reliable, and simple enough for beginners while still supporting meaningful STEM projects and curriculum goals. Unlike a hobby 3D printer for a garage, a printer for education has to run consistently, day after day, with minimal troubleshooting. It needs friendly software, clear guides, and support that teachers can actually reach when something goes wrong. The right choice helps students design, prototype, and understand engineering concepts. The wrong one ends up unplugged in a storage closet. You also have to balance budget, durability, and long term costs: filament, nozzles, maintenance, and training. A slightly higher price up front can save hours of teacher frustration and IT tickets later. If you want a printer that truly fits your classrooms and STEM goals, start by listing how your students and teachers will use it this year, not just what the spec sheet promises. If you would like a short list of education ready options instead of sifting through hobby reviews, use this guide as your shortcut and request our current recommendations for your grade levels and budget.
What makes a 3D printer truly elementary classroom ready
A 3D printer is elementary classroom ready when a new teacher can run a full project from 3D design to finished print without needing an on site expert. That means a fully enclosed or mostly enclosed FDM 3D printer, quiet operation, and safety features that protect younger students while they learn the basics of 3D printing. Classroom ready systems pair hardware with friendly software tools and slicers that students and teachers can understand quickly. Think simple touchscreen menus, auto bed leveling, reliable auto leveling sensors, and pre tested profiles for PLA filament so you get consistent, accurate prints without constant calibration. Many printers for kids and beginners also include guided lesson plans, Thingiverse project links, and curriculum aligned activities. You are looking for a balance between simplicity and functionality: enough features to support real STEM and art projects, but not so many knobs and advanced materials that teachers feel overwhelmed. When a printer supports wireless management, classroom accounts, and strong US support contact, it becomes a teaching tool instead of a tech headache. If you want help matching features to your specific classrooms and age ranges, reach out for a quick, no pressure recommendation tailored to your students and teachers.
Safety first 3D printing features for younger students
For elementary ages, safety features are nonnegotiable. A fully enclosed build area keeps small hands away from hot nozzles and moving parts, while also helping contain fumes from heated plastic. Many education ready 3D printers add HEPA or carbon filtration and controlled ventilation to reduce odors and particles during 3D printing. Look for printers with auto pause when the door opens, covered or shielded nozzles, and clearly labeled hot surfaces. A quiet, enclosed system also reduces classroom noise, so the printer can run during lessons without becoming a distraction. Using PLA filament and avoiding ABS filament in younger grades keeps fumes lower and makes supervision easier. Safety extends to software too. Cloud accounts, student logins, and simple user interfaces help teachers manage who can start prints and adjust settings. When you combine safer hardware with guided software and clear classroom rules, students can explore 3D design and creativity with far less risk. If you are comparing models now, make a quick safety checklist and contact us for a short list of printers that meet strict elementary safety standards.
Ease of use for teachers who are new to 3D printers
Many teachers handed a printer for beginners are also brand new to 3D printing. They need a system that is easy to assemble, or arrives fully assembled, with a fast setup process, auto leveling, and slicer software that feels familiar, not intimidating. A clear touchscreen, simple menus, and preloaded print profiles go a long way. Education ready 3D printers often include starter guides, classroom friendly software, and training resources that walk teachers through their first project step by step. Features like auto bed leveling, filament runout detection, and guided calibration reduce failed prints and save precious prep time. Reliable wifi or USB and SD card options give flexibility for different IT policies. When a teacher can go from unboxing to a successful print in under an hour, confidence grows quickly. That confidence is what turns a single demo into ongoing STEM projects, art projects, and cross curricular lessons that truly engage students. If you are a teacher thinking, “I need something my students and I can manage without IT on speed dial,” ask for our short list of the easiest printers for beginners and classrooms.
Common mistakes schools make when selecting 3D printers for kids
Many schools buy a 3D printer with good intentions, only to see it sit idle. The most common mistake is treating the purchase like a consumer gadget instead of a classroom system. Specs such as maximum print speed or giant build volume matter less than reliability, support, and how well the printer fits your curriculum. Another frequent issue is focusing only on the upfront price. A cheaper hobby machine can look attractive on paper but cost more in teacher time, failed prints, and constant troubleshooting. Without strong support, clear guides, and education focused software, teachers lose confidence and stop using the printer. Schools also underestimate how many students will want to print once they see it in action. A single hobby printer with slow speeds and small print size cannot keep up with multiple classes and projects. That leads to long queues, frustration, and missed learning opportunities. If you want to avoid these traps, start with your teaching goals and student volume, then contact us for a quick, vendor neutral guide to printers for education that actually get used.
Underestimating total cost of ownership for 3D printing
The sticker price is only part of the story. Total cost of ownership includes filament, spare nozzles, build plates, maintenance, software, and staff time. A low cost desktop printer that constantly needs manual bed leveling, repairs, or reprints can quietly drain your budget and patience. Education ready systems often include value stacking: longer warranties, better reliability, and bundled lesson plans or software tools that reduce training costs. They use common PLA filament spools, have durable components, and are designed to run consistently in busy classrooms. That reliability means fewer wasted prints and less time spent troubleshooting. Grants and funding can help with the initial purchase, but ongoing costs still land on your school. Planning for filament usage, replacement parts, and support contracts up front keeps your 3D printing program sustainable. If you would like a simple cost breakdown template and sample pricing for different usage levels, request our TCO guide before you commit to any specific model.
Choosing hobby grade 3D printers instead of education ready systems
Hobby grade 3D printers from brands like Creality or budget Kickstarter projects can be great in a garage, but they often fall short in classrooms. Open frames, exposed hot ends, loud fans, and constant tinkering do not mix well with younger students and tight schedules. Teachers need reliability and safety more than experimental features. Education ready printers from vendors such as MakerBot, Flashforge, or Bambu Lab focus on enclosed designs, safer interfaces, and strong support for schools. They integrate with classroom management tools, offer friendly software, and often include training, lesson plans, and real US support. That support contact matters when a print fails the day before a big STEM fair. While a hobby printer might seem cheaper, the hidden costs show up in lost class time, frustrated teachers, and abandoned equipment. An education focused system is built for students and educators, not hobbyists who enjoy constant tweaking. If you are debating between a cheaper hobby model and a true printer for schools, reach out for a side by side comparison so you can choose with confidence and protect both your budget and your teachers’ time.
How to evaluate the best 3D printer for elementary schools: a practical framework
When you are choosing the best 3D printer for elementary schools, you are really choosing how easy or hard your life will be for the next few years. The right printer quietly supports your STEM curriculum, runs reliably, and keeps students safe. The wrong one sits in a corner with a half finished project and a frustrated teacher. Start with three pillars: safety, simplicity, and support. For K to 5 classrooms, a fully enclosed FDM 3D printer with strong safety features, low fumes, and quiet operation matters more than exotic materials or extreme print speed. You want a printer for beginners that arrives mostly assembled, with auto leveling or guided bed leveling, so teachers are not stuck calibrating nozzles during prep time. Next, look at the full system, not just the hardware. Does the printer include friendly software, age appropriate 3D design tools, and curriculum aligned lesson plans? Can students manage a simple workflow from Tinkercad to slicer software to print bed without constant hand holding? Brands that focus on printers for education, including MakerBot and the Flashforge Adventurer series, often bundle guides, projects, and US support that save you hours. Finally, weigh price against reliability and warranty. A cheaper desktop unit that constantly jams costs more in lost class time than a slightly higher priced, durable model with strong support contact and a clear return policy. If you would like a short list of recommendations tailored to your grade levels, budget, and classroom setup, share a few details about your school and get a no pressure, expert recommendation.
Key 3D printer specifications that matter for K to 5 classrooms
Technical specs can feel abstract, but for K to 5 classrooms they translate directly into, “Will this work during my 45 minute block?” Focus on a few key features: build volume, print speed, resolution, supported materials, and safety systems. For younger students, you rarely need a huge build area. A compact, enclosed 3D printer with a moderate build volume is usually enough for school projects, art projects, and simple engineering concepts. Prioritize consistent print quality, quiet operation, and friendly features over chasing the biggest numbers on a spec sheet. Print speed and reliability go hand in hand. A 3D printer that advertises 600 mm per second high speed but fails mid print is worse than a slower, steady machine. Look for reviews from teachers and makerspaces that mention reliable, consistent, and easy to manage. Auto leveling or guided bed leveling, a sturdy build plate, and a clear touchscreen interface reduce troubleshooting and keep your focus on students, not hardware. Finally, check that the printer supports safe filament for beginners, has good ventilation or filtration, and offers wifi or USB and SD card options that match your school’s IT policies. If you would like help translating spec sheets into, “Will this work in my classroom?”, send over the models you are considering and get a quick, plain language comparison.
Build volume, print speed, and resolution explained in classroom terms
Build volume is simply how big a project you can print. For elementary students, a print size around 100 x 100 x 100 mm, or slightly larger, comfortably handles keychains, name tags, small sculptures, and functional classroom tools. A huge large format build area sounds impressive, but it also means longer print times and more failed giant projects. Print speed affects whether a project finishes during the school day. Many speedy 3D printers advertise high numbers, but for classrooms you want a balance between speed and reliability. A printer that can produce small parts in 30 to 60 minutes at a moderate printing speed is far more useful than one that claims extreme speeds but needs constant adjustments. Resolution is how detailed the print looks. For K to 5, you rarely need ultra fine layers. Standard classroom friendly settings already give quality prints that excite students and clearly show 3D models and design thinking. Higher resolution means longer print times, which can frustrate younger ages waiting to see results. When you compare options, ask: “Can this printer finish a typical student project between morning and dismissal, and does the build volume match the projects in my curriculum?” If you would like sample print settings and project sizes that work well in real classrooms, request a quick starter guide tailored to your grade levels.
Filament types and materials that are safest for elementary students
For elementary classrooms, PLA filament should be your default. PLA is a plant based plastic that prints at lower temperatures, has milder fumes, and works well on most FDM 3D printers made for kids and beginners. It is affordable, widely available in classroom friendly kits and spools, and still delivers accurate, durable parts for school projects. Avoid jumping straight into ABS filament or exotic flexible filament for younger students. ABS and some advanced materials like carbon filled filament can produce stronger fumes, need higher temperatures, and often require better ventilation or a HEPA filter. That is more management and supervision for you, with little benefit for basic STEM education projects. Look for printers that clearly state they support PLA filament out of the box, with enclosed build areas and safety features that keep hot nozzles and moving parts away from curious hands. Color printing with multiple PLA spools can keep projects fun without adding risk. If you are unsure whether a specific filament or material is suitable for your ages and learning environment, send the product name or link and get a quick “safe or skip” opinion before you buy.
Evaluating 3D printer software, curriculum, and student workflow
Hardware gets the attention, but software and workflow decide whether your 3D printer becomes a daily teaching tool or an occasional demo. For the best 3D printer for elementary schools, you want a full system: friendly software tools, clear slicing guides, and curriculum that matches your standards. Start with the 3D design path. Can students move from Tinkercad or another beginner friendly 3D design tool into your slicer software, such as Ultimaker Cura, PrusaSlicer, or a bundled slicer, with just a few guided steps? A simple, consistent workflow, design, slice, send to printer, helps students learn the basics and frees you from constant one on one troubleshooting. Next, check classroom management features. Some printers for education offer cloud dashboards, queue management, and camera monitoring so you can manage multiple student projects from one screen. Wifi or ethernet connectivity, user accounts, and easy file upload, USB or SD card, all reduce chaos when 20 students want to print at once. Finally, look for curriculum and lesson plans that connect 3D printing to math, science, art, and coding, not just toy projects. Strong vendors provide guides, workshops, and support contact so teachers and students can grow over time. If you would like help mapping a simple student workflow from 3D design to finished print for your specific devices and grade levels, share your current tools and get a ready to use classroom flow.
Age appropriate 3D design tools and classroom management features
For K to 5, the 3D design experience must feel approachable. Tools like Tinkercad and other browser based 3D design platforms let students drag, drop, and combine shapes to create functional models without advanced CAD skills. This supports design thinking, creativity, and early engineering concepts without overwhelming beginners. Your 3D printer software should match that simplicity. Look for slicers or bundled software with a friendly interface, presets labeled beginner or classroom, and minimal print settings exposed to students. A clear export to 3D printer or send to print path keeps the focus on learning, not wrestling with advanced options. Classroom management features matter once students become more independent. Cloud based queues, user profiles, and basic permissions help teachers and students share a single printer without losing files or mixing up projects. A built in camera, status messages, and notifications can help you monitor prints while teaching. If you would like a short list of age appropriate 3D design tools and management features that work well with your existing devices, send your grade range and number of students and get a tailored setup suggestion.
Curriculum aligned 3D printing lesson plans and projects
A 3D printer becomes truly valuable when it plugs directly into your curriculum. Look for vendors and platforms that offer ready made lesson plans, project guides, and assessments aligned to STEM education standards and art or design goals. Many printers for schools now ship with access to project libraries, from simple name tags to functional science models. Strong curriculum resources walk teachers step by step: objectives, materials, 3D files, print settings, and reflection questions. They help students understand not just how to print, but why a design works, how to improve accuracy, and how 3D printing connects to real world engineering and prototyping. Sites like Thingiverse Education and partners such as MyStemKits can expand your library with vetted classroom projects. For K to 5, prioritize short, engaging projects that can be printed in under a day and tied to math, science, literacy, or social studies. This keeps the printer integrated into everyday lessons instead of a one off STEM day event. If you would like sample lesson plans and project ideas matched to your grade level and subject area, reach out with your standards focus and get a curated set of ready to teach 3D printing activities.
Top features that define the best 3D printer for elementary schools today
When you are choosing the best 3D printer for elementary schools, you are really choosing what kind of learning experience your students will have. The right printer turns 3D printing from a cool gadget into a reliable classroom tool that supports your curriculum, not distracts from it. For younger students, the key features are safety, reliability, and ease of use. An enclosed, fully assembled FDM 3D printer with auto leveling, quiet operation, and consistent print quality lets you focus on teaching instead of troubleshooting. Friendly software, clear touchscreen controls, and wireless connectivity make it easy for teachers and students to manage projects, even if they are beginners. You also want a printer that fits your budget without feeling cheap. That means a sturdy desktop unit, reasonable pricing on PLA filament and accessories, and strong US support if something goes wrong. When those pieces come together, 3D printers stop being a risk and start becoming a dependable part of your STEM and art projects. If you are comparing options right now and wondering which features matter most for your classrooms, use this guide as your shortcut. Reach out for a simple, no pressure recommendation tailored to your grade levels, budget, and existing curriculum.
Safety, reliability, and classroom durability in 3D printers
In an elementary classroom, you need a 3D printer that feels as safe and predictable as a classroom Chromebook. That means strong safety features, consistent reliability, and hardware that can handle daily student use without constant repairs. The best 3D printer for elementary schools runs quietly, manages fumes, and keeps hot parts away from curious hands. At the same time, it needs to start prints quickly, recover from minor mistakes, and deliver accurate, repeatable results so your lessons do not fall apart when a project fails. When you choose a printer built for education instead of hobby use, you reduce supervision stress, IT tickets, and wasted filament. That is what frees you and your students to focus on creativity, problem solving, and real STEM learning. If you are tired of worrying whether a 3D printer will be safe or behave during class, ask for a short list of printers for education that match your safety policies and daily schedule.
Enclosed build chambers, filtration, and safety certifications
For younger ages, a fully enclosed build chamber is nonnegotiable. An enclosed 3D printer keeps tiny fingers away from the hot nozzle and print bed, contains moving parts, and helps manage fumes from materials like ABS filament or other plastics. Look for models with HEPA or carbon filtration and clear ventilation paths, especially if your classroom has limited airflow. Safety certifications and education focused designs from brands such as Flashforge, MakerBot, or Bambu Lab give you extra confidence that the system was built with students and teachers in mind, not just hobbyists in a garage. These safety features do not just protect students. They also protect your program. They make it easier to get approval from administrators, parents, and facilities staff, and they reduce the risk of a printer being pulled from the classroom after one complaint. If you want help choosing an enclosed, safer printer for beginners that aligns with your district’s safety requirements, request a quick, no obligation shortlist tailored to your grade levels and room setup.
Serviceability and uptime for busy elementary school schedules
In an elementary schedule, you rarely get a second chance at a missed lesson. That is why serviceability and uptime matter as much as print quality. The best 3D printer for elementary schools is one that simply works when you press print and is easy to fix when something goes wrong. Look for printers with strong US support, clear troubleshooting guides, and easily replaceable parts such as nozzles, build plates, and spool holders. Auto leveling, reliable bed adhesion, and consistent filament feeding reduce failed prints and last minute scrambles. A sturdy, classroom ready design means fewer broken components when students are excited and hands on. Many educators report that once they switched to an education focused printer with dependable support contact and warranty coverage, their 3D printing projects stopped stalling out. That reliability is what turns a single printer into a long term investment instead of a one year experiment. If you want help picking a printer that will stay online all year with minimal IT intervention, reach out for a quick recommendation based on your support expectations and budget.
Student engagement and learning outcomes with 3D printing
When 3D printing enters the classroom with the right hardware and software, student engagement jumps. Students stop being passive consumers of content and start becoming designers, problem solvers, and makers. The best 3D printer for elementary schools supports hands on projects that connect directly to your curriculum: math manipulatives, science models, art projects, and simple engineering challenges. With friendly slicer software, easy setup, and age appropriate 3D design tools such as Tinkercad, even beginners can move from idea to printed object in a single class period. Teachers often see quieter students come alive when they can hold their thinking in their hands. That shift leads to better retention of STEM concepts, stronger collaboration, and more pride in school projects. When the printer is reliable and simple to manage, you can run more projects across more classrooms without burning out staff. If you want your students to move beyond worksheets into real world making, start by choosing a printer that truly supports engagement and learning outcomes. Ask for a tailored list of printers and starter kits that match your grade levels and subject areas.
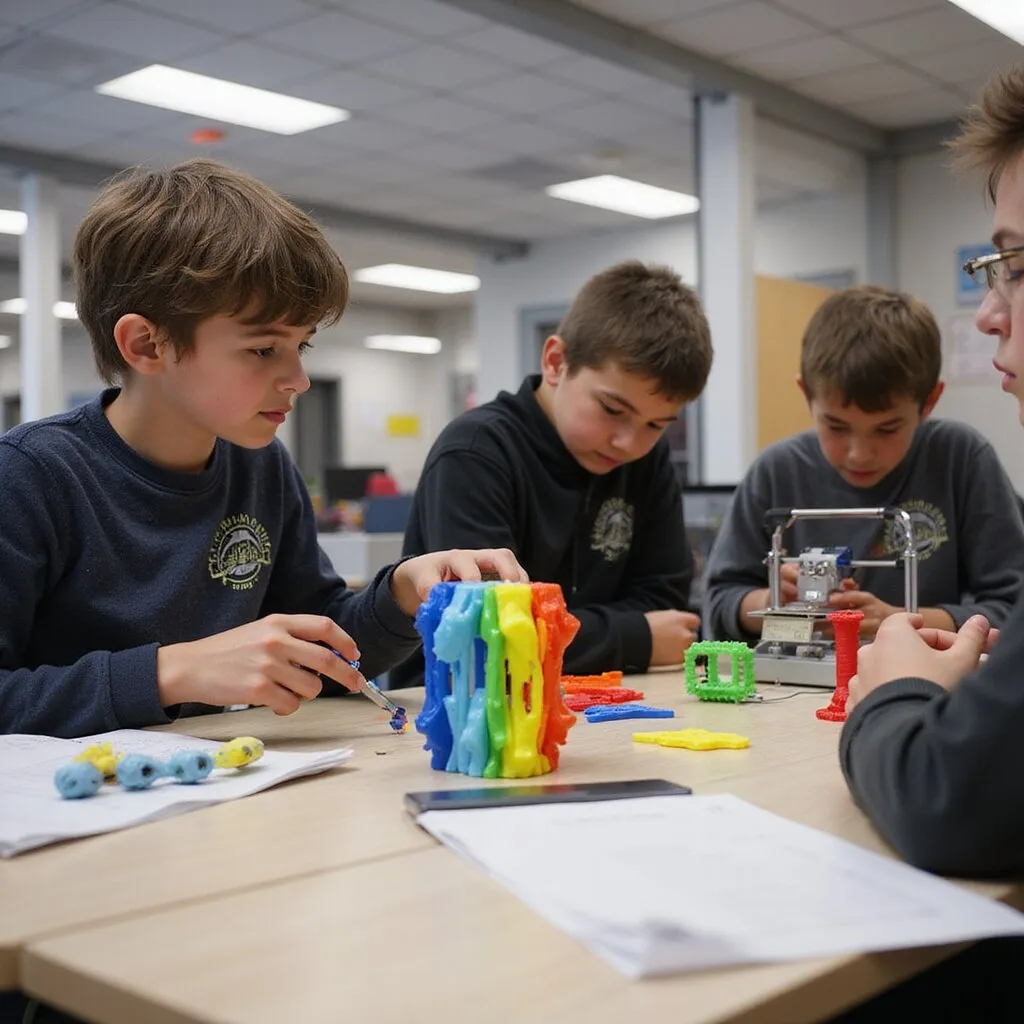
Hands on STEM, art, and makerspace projects for younger learners
Elementary students learn best when they can touch, test, and play with ideas. A classroom 3D printer turns abstract concepts into concrete objects: fraction tiles, life cycle models, custom game pieces, or sculptures for art projects. With an easy printer for beginners, students can design in simple tools, slice with friendly software, and watch their creations appear layer by layer. PLA filament keeps materials safer and budget friendly, while a compact, fully enclosed printer fits neatly into a makerspace or corner of the classroom. Teachers can pull ready to print 3D models from Thingiverse or curated educational resources when they need a quick project. These hands on projects do not require you to be a 3D printing expert. Many educators start with guided lessons and gradually let students design their own functional objects and creative pieces. The result is more excitement, better STEM education outcomes, and stronger connections across subjects. If you would like a simple starter set of classroom ready 3D printing projects and recommended printers for kids, request a free guide tailored to your grade band and subject focus.
Building problem solving and design thinking skills with 3D printers
3D printing naturally teaches design thinking: students imagine, design, test, and improve. When a print fails or does not work as expected, they learn to adjust dimensions, change print settings, or rethink their approach instead of giving up. The best 3D printer for elementary schools supports this cycle with consistent accuracy and clear feedback. Students can see how small changes in their 3D design or slicer settings affect the final object. Over time, they start to think like engineers, planning ahead, measuring carefully, and collaborating to solve problems. Teachers report that students who struggle with traditional assessments often thrive in this environment. They can show understanding through prototypes, models, and functional designs, which builds confidence and persistence. Those are skills that carry into coding, math, science, and beyond. If you want your students to practice real world problem solving, not just memorize facts, start by choosing a printer and software setup that makes design thinking accessible. Reach out for a quick, no pressure recommendation that fits your students’ ages, your curriculum goals, and your budget.
AGC Education’s recommended 3D printer solutions for elementary schools
AGC Education recommends 3D printer solutions that are built for one goal: make 3D printing easy, safe, and reliable for elementary classrooms. If you are asking, “What is the best 3D printer for elementary schools that my teachers will actually use?” this is where you start. Every recommended system is fully assembled, classroom ready, and focused on safety features such as fully enclosed build areas, HEPA or carbon filtration, and quiet operation. You get consistent print quality, auto leveling, and friendly software so students and teachers can focus on projects, not troubleshooting. From a single desktop 3D printer for beginners to schoolwide printers for education, AGC balances price, durability, and print speed. You get the right build volume for student projects, reliable filament management, and slicer software that works with common tools such as Tinkercad and Ultimaker Cura. If you want a clear guide, real support, and recommendations that match your budget and age range, talk with AGC Education about the best 3D printer for elementary schools for your district. Request a quick consult and get a no pressure quote today.
Turnkey 3D printer bundles designed specifically for elementary classrooms
Turnkey 3D printer bundles from AGC Education are built so an elementary teacher can go from unboxing to printing in a single class period. No guessing on filament, no hunting for lesson plans, no confusing software installs. Everything is pre selected for younger students and busy teachers. These bundles pair safe, fully enclosed 3D printers for kids with friendly interfaces, auto bed leveling, and consistent print quality. The systems support PLA filament and other classroom safe materials, with quiet operation that fits right into your learning environment. Each bundle is aligned to STEM and STEAM education goals, so students design, prototype, and print functional projects that connect to math, science, art, and engineering concepts. You get printers for beginners that still offer accuracy, reliability, and the flexibility to grow into more advanced materials later. If you want a printer for elementary classrooms that just works and comes with everything needed to start, schedule a quick call with AGC Education and ask about their turnkey 3D printing classroom bundles.
What’s included in an elementary 3D printing classroom bundle
An AGC Education elementary 3D printing bundle includes far more than a single 3D printer. You receive a fully assembled, classroom safe FDM 3D printer with an enclosed build area, touchscreen controls, auto leveling, and a build plate sized for typical school projects. Bundles include starter PLA filament spools, extra nozzles, build plates, and basic accessories such as a spool holder and tools for maintenance. You also get age appropriate slicing software, preconfigured print settings, and friendly software tools that make it easy for students and educators to manage files from SD card, USB, or wifi. On the instructional side, AGC adds curriculum aligned lesson plans, project guides, and classroom management tips. Many bundles include access to 3D models, Thingiverse collections, and ready to print art projects so students can start printing on day one. If you want a clear, budget friendly kit that covers hardware, software, and curriculum in one purchase, contact AGC Education and ask for an elementary 3D printing classroom bundle quote.
Scaling from a single 3D printer to a schoolwide or districtwide program
Many districts start with one pilot 3D printer in a single classroom or makerspace, then quickly see demand spread across grades. AGC Education helps you move from that single printer to a managed, schoolwide or districtwide 3D printing program without chaos. They help you standardize on a small set of reliable 3D printers, filament, and slicers so IT and teachers are not juggling ten different systems. You get guidance on build volume needs, print speed, and durability for different ages, from early grades to high school students. AGC also supports you with purchasing strategies, grants, and pricing options that keep costs predictable. They help you plan storage, ventilation, supervision, and workflows so students can print consistently and safely across multiple classrooms. If you are ready to grow beyond a single desktop printer and want a clear path to a districtwide 3D printing program, reach out to AGC Education for a planning session and tailored recommendations.
How AGC Education supports 3D printer setup, training, and ongoing success
Buying the best 3D printer for elementary schools is only half the story. AGC Education stays with you through setup, training, and long term support so your printers for education keep running and your teachers stay confident. From day one, you get guided setup, calibration, and software configuration. AGC helps your staff with wifi connectivity, slicer software, and basic maintenance so they can manage print jobs without constant IT help. Ongoing support includes troubleshooting, replacement parts, and friendly guidance on materials like PLA filament, ABS filament, and flexible filament. You also gain access to updated lesson plans, project ideas, and management tips that keep students engaged year after year. If you want a partner that supports your 3D printing system long after the purchase order, contact AGC Education and ask about their full setup and support services.
On site implementation, teacher onboarding, and student certifications
AGC Education offers on site implementation so your 3D printers arrive, get installed, and start producing quality prints quickly. Their team handles assembly checks, calibration, and test prints, so teachers walk into a classroom with a working system, not a box of parts. Teacher onboarding focuses on real classroom tasks: loading filament, using the touchscreen, sending files from friendly software, and managing multiple student projects. Sessions are hands on, using your actual curriculum and grade level projects. For students, AGC provides pathways to 3D printing certifications that recognize skills in 3D design, slicing, and safe operation. These certifications help students become confident makers and give your program visible outcomes for parents and administrators. If you want your staff and students to feel ready on day one, ask AGC Education about on site implementation, onboarding, and student certification options when you request your quote.
EmpowR Academy and ongoing professional development for 3D printing
AGC Education’s EmpowR Academy gives your teachers ongoing professional development so 3D printing does not fade after the first year. Sessions are built for beginners and advanced users, covering everything from basic printer for beginners training to advanced materials and design thinking. Teachers learn how to integrate 3D printing into math, science, art, and STEM education, using real lesson plans and classroom examples. They explore software tools such as Tinkercad, PrusaSlicer, and other slicer software, and see how to manage print queues, supervision, and safety features in busy classrooms. EmpowR Academy also offers workshops, webinars, and on demand guides, so new staff can get up to speed quickly and experienced educators can keep pushing into more complex projects and functional prototypes. If you want 3D printing to become a lasting part of your curriculum, not a one year experiment, connect with AGC Education and enroll your staff in EmpowR Academy’s 3D printing professional development.
Comparing the best 3D printer options for elementary schools: checklist for teams
When you are choosing the best 3D printer for elementary schools, you are not just buying hardware. You are choosing a system that has to be safe, reliable, and simple enough for busy teachers and young students to use without constant IT help. Start with a short checklist for your team: safety features, fully enclosed, HEPA filter, ventilation, ease of setup, friendly software, print quality, noise level, and total cost over 3 to 5 years. For elementary classrooms, an enclosed FDM 3D printer with auto bed leveling, quiet operation, and kid friendly touchscreen controls usually beats a faster, more advanced open frame machine. Bring teachers into the decision. Ask: “Can my students design in Tinkercad and send a print wirelessly?” “Will this fit our STEM curriculum and art projects?” “If something jams, can I fix it in under 10 minutes?” A short pilot with one or two printers for kids in real classrooms often reveals more than any spec sheet. If you would like a simple, printable checklist you can use in your next team meeting, reach out and request our elementary 3D printer selection guide tailored to your grade levels and budget.
3D printer comparison matrix for elementary education use cases
A clear comparison matrix helps your team move from overwhelmed by options to confident short list in one meeting. For each candidate 3D printer for schools, score it across the categories that matter for elementary students and teachers. Key columns to include: safety, fully enclosed, locking door, fume control, filament type, PLA versus ABS filament, ease of use, auto leveling, touchscreen, friendly interface, wireless, wifi, classroom management tools, print quality and speed, accuracy, resolution, build volume, reliability over long jobs, ecosystem, curriculum, slicer software, support contact, spare parts, filament and accessories, and total cost, price, consumables, maintenance, warranty. You can even rate each printer 1 to 5 for teacher setup, student independence, and noise in my classroom. That simple score view often makes the best 3D printer for elementary schools stand out quickly. If you would like a ready made comparison matrix pre filled with leading education models from MakerBot, Flashforge, Creality, and others, contact us and we will send you an editable version you can share with your team.
Questions to ask vendors about 3D printer warranties and support
The best hardware still fails if support is slow or confusing. Before you buy, ask vendors direct, practical questions about warranties and service so you are not stuck with a silent printer mid semester. Use questions like: “What exactly does the warranty cover, and for how long?” Include nozzles, build plate, LCD, motors, wifi board, and more. “Is support handled by US support staff during school hours?” “What is your average response time for teachers and IT?” “Do you offer loaner 3D printers or fast replacements if a unit is down?” “Are there any required paid service plans to keep the warranty valid?” Also ask about training: “Do you provide live onboarding for educators, or only online guides?” A slightly higher price can be worth it if it comes with strong support, clear lesson plans, and a real person to call when a print fails. If you would like a vendor question worksheet you can bring to your next demo call, send a quick message and we will share the exact script districts use to protect their investment.
Evaluating 3D printer ecosystems: hardware, software, and supplies
For elementary classrooms, you are not just buying a 3D printer. You are buying into an ecosystem that needs to run smoothly for years. A strong ecosystem reduces teacher frustration and keeps students printing instead of waiting. On the hardware side, look for enclosed FDM 3D printers with consistent print quality, auto calibration, and durable components. On the software side, check that the slicer is simple, supports cloud or wifi printing, and works with student friendly 3D design tools such as Tinkercad. Bonus points if the system includes classroom management features so teachers can queue jobs from multiple students. Supplies matter just as much. Ask: “Can we get PLA filament, build plates, and nozzles quickly from multiple sources?” “Are there education bundles with spools, storage, and spare parts?” A printer that only works well with one expensive filament can quietly double your long term costs. If you would like help reviewing your short list for ecosystem strength, hardware, software, and supplies, reach out for a quick, no obligation review of your options.
Budget planning and funding strategies for elementary 3D printing programs
A 3D printer project that starts strong and then stalls due to hidden costs helps no one. A simple budget plan keeps your STEM and art projects running all year without surprise expenses landing on your desk. Break your plan into three buckets: upfront hardware, printers, carts, ventilation if needed, annual consumables, PLA filament spools, build plates, nozzles, and support, training, extended warranty, occasional repairs. For most elementary classrooms, consumables and maintenance over three years can match or exceed the original printer price, so they deserve equal attention. Map your budget to real use: “Two printers, 300 students, one project per quarter.” That gives you a realistic estimate of filament, build plate wear, and teacher time. Then layer in funding sources: building budget, district STEM funds, PTO, and grants. If you would like a simple budgeting template that shows three year costs for different 3D printers for education, contact us and we will share a version you can adapt to your school.
Estimating annual consumables and maintenance for 3D printers
A realistic estimate for consumables and maintenance keeps your printers for kids running instead of gathering dust. Start with filament: for elementary projects, many schools plan on 1 to 2 kg of PLA filament per active printer per month during heavy use, less for lighter use. Add in wear parts: build plates, nozzles, and maybe a spare extruder. Enclosed printers with good bed leveling and consistent calibration usually need fewer replacements and less troubleshooting, which saves both money and teacher time. Do not forget simple accessories such as spatulas, storage bins for spools, and SD card or USB backups. Maintenance time has a cost too. Ask vendors for realistic maintenance expectations: “How often will my teachers need to clean, re level, or replace parts?” A slightly more expensive, reliable printer for beginners can pay for itself in fewer failed prints and less staff frustration. If you would like help estimating annual costs for your specific student count and project load, reach out and we will build a quick, custom consumables forecast for your program.
Leveraging grants and STEM initiatives to fund 3D printing
Many elementary schools fund their best 3D printer for elementary schools through grants and STEM initiatives instead of relying only on building budgets. The key is tying your 3D printing program directly to student outcomes and curriculum goals. Frame your project around STEM education, design thinking, and cross curricular projects: math models, engineering concepts, art sculptures, and coding integrations. Grant reviewers respond well to clear plans: number of students reached, grade levels, sample lesson plans, and how 3D printing will help students learn the basics of 3D design and problem solving. Look for local education foundations, STEM grants, and corporate programs that support printers for education, makerspaces, and technology in classrooms. Vendors with strong education experience often provide sample grant language, pricing bundles, and letters of support that make your application stronger. If you would like sample grant wording and a one page program overview you can adapt for your school, contact us today and ask for our elementary 3D printing funding starter kit.
Real classroom results: how the best 3D printer for elementary schools impacts learning
When the best 3D printer for elementary schools lands in a classroom, you feel the shift almost immediately. Students who usually hang back start raising their hands. Quiet kids light up when they see their 3D models appear layer by layer on a fully enclosed, safe machine that feels made for kids, not engineers. Because modern 3D printers for education are quiet, reliable, and easy to manage, they fit into real classrooms, not just glossy STEM labs. Teachers use friendly software and simple slicers to move from 3D design to quality prints without constant troubleshooting. That means more time for STEM education, literacy, and art projects, and less time fighting bed leveling, calibration, or filament jams. The right printer for beginners turns abstract concepts into something students can hold. Fractions, ecosystems, story settings, engineering concepts, suddenly they are not just on a page. Students design, prototype, and revise, learning the basics of design thinking and problem solving while they work. If you want your students and teachers to feel that same shift, more engagement, more confidence, less stress, start by choosing a printer for schools that is safe, affordable, and classroom ready. Reach out today for a quick, no pressure recommendation tailored to your grade levels, budget, and existing curriculum.
Case examples of elementary students using 3D printers across subjects
In one fourth grade classroom, students used a compact FDM 3D printer to design fraction pizzas. Each group created 3D models that showed equivalent fractions, then printed them with PLA filament. During math talks, students could physically swap slices to explain their thinking, and even struggling learners joined the conversation. In a third grade science unit, students designed simple animal habitats in Tinkercad, then printed scaled models to show adaptations. The teacher reported that students who rarely completed written work were suddenly staying in from recess to finish their 3D printing projects. The printer’s consistent print quality and enclosed build volume meant the teacher did not worry about safety or fumes. A second grade literacy class used a printer for kids to bring story characters to life. Students created basic shapes for heroes and settings, then used those 3D prints as prompts for writing stronger descriptive paragraphs. The teacher used ready made guides and lesson plans from Thingiverse Education and other educational resources, so planning time stayed manageable. If you want these kinds of cross curricular wins in your own classroom, schedule a short call. We will match you with the best 3D printer for elementary schools and share starter projects you can run in your next unit.
Integrating 3D printing into science, math, and literacy projects
You do not need a full makerspace to integrate 3D printing into your existing curriculum. With the right printer for beginners and a few guided projects, you can plug 3D design into science, math, and literacy without rewriting your entire pacing guide. In science, students can print models of the solar system, plant cells, or simple machines. Using a reliable, fully enclosed 3D printer, they compare 3D prints to diagrams in their textbooks, helping them understand scale, structure, and function. Quick printing speed and consistent accuracy mean you can run a full class set of small models over a few days. In math, teachers use 3D printers to create manipulatives: fraction bars, area tiles, and geometry solids. Students design their own measurement tools, then test them, learning about precision, error, and revision. Because modern printers handle PLA filament and other classroom safe materials, you can keep costs low while still getting durable, functional pieces. For literacy, students design story settings, character tokens, or problem and solution objects that appear in their narratives. The act of planning a 3D model forces them to clarify details in their writing. Many educators lean on free slicer software, templates, and classroom kits from brands such as Flashforge, MakerBot, or Creality to keep setup simple. If you would like ready to teach STEM and literacy projects aligned to your standards, contact us. We will recommend a best 3D printer for elementary schools bundle that includes lesson plans, slicer settings, and student friendly guides.
Supporting inclusive and differentiated instruction with 3D models
3D printing can quietly solve a problem you face every day: how to reach students with very different needs in the same classroom. Tactile 3D models give visual, kinesthetic, and neurodivergent learners a way into content that flat worksheets never provide. For students with reading challenges, 3D prints of vocabulary words, story scenes, or science concepts reduce the language barrier. A student who struggles to decode pyramid can still hold and explore one, then connect the word to a real object. Teachers report that students with IEPs participate more when they can touch and manipulate 3D models. You can also differentiate by product. Some students design from scratch in Tinkercad, while others start from a Thingiverse file and modify it. The same 3D printer supports both groups, letting advanced students push into more complex 3D design while beginners work with guided templates. Because the printer is enclosed and has strong safety features, you can focus on instruction instead of constant supervision. Over time, your classroom builds a library of reusable 3D models: math manipulatives, braille labels, custom number lines, and more. That is value that grows every year without extra cost. If you want help choosing a printer for schools that supports inclusive instruction and special education goals, reach out for a tailored quote and sample differentiation projects.
How teacher confidence grows with the right 3D printer and support
Many elementary teachers worry they are not techy enough for 3D printing. The turning point usually comes when they see a fully assembled, classroom safe printer run a successful job on day one, no complex assembly, no mystery error codes, no mess. The best 3D printer for elementary schools comes with friendly software, auto leveling or guided bed leveling, and clear on screen prompts. That means teachers do not have to be engineers to manage filament, adjust print settings, or handle basic troubleshooting. A quiet, enclosed system with a simple touchscreen and wifi or USB connectivity feels manageable, even in a busy classroom. Confidence grows even faster when teachers have access to short, focused training and real support contact. A 30 to 60 minute workshop, plus a quick start guide with screenshots from the slicer software, is often enough to get them from “I am nervous” to “My students can also run this.” Knowing there is US support, warranty coverage, and clear guides reduces the fear of breaking something expensive. If you want your staff to feel confident instead of overwhelmed, choose a printer for education that includes professional development, curriculum, and responsive support, not just hardware. Contact us to see packages that bundle 3D printers, training, and classroom ready projects for one predictable price.
Reducing teacher workload with ready made 3D printing resources
3D printing should not add hours to a teacher’s planning time. With the right ecosystem, it actually saves time by replacing one off prep with reusable, durable classroom tools. Many education focused 3D printers integrate with libraries of ready made models and lesson plans. Teachers can pull standards aligned projects, STL files, and slicer profiles in minutes. Instead of designing from scratch, they tweak an existing project, hit print, and focus on teaching. Platforms such as MyStemKits, Thingiverse Education, and vendor specific libraries for MakerBot or Flashforge Adventurer printers give you hundreds of options. Because prints are sturdy and reusable, you stop recutting paper manipulatives or relaminating centers every year. A single set of 3D printed math tiles or literacy tokens can serve multiple classes and grade levels. Over time, that reduces both workload and material costs. The best 3D printer for elementary schools also includes classroom management tools: filament usage tracking, simple queue management, and clear maintenance guides. That keeps surprises low and reliability high. If you are interested in 3D printing but worried about time, ask us about bundles that include printers, filament, lesson libraries, and professional development. We will help you choose a setup that lightens your load instead of adding to it.
Building a sustainable elementary makerspace culture over time
A single 3D printer can be the seed of a sustainable makerspace culture, not just a one year STEM fad. The key is choosing hardware and software that grow with your students and staff. Start with a printer for beginners that is safe, enclosed, and easy to assemble, or arrives fully assembled. As teachers and students gain confidence, you can add more advanced features such as multicolor printing, a larger build volume, or additional materials like flexible filament. Brands such as Bambu Lab, Prusa, and MakerBot offer upgrade paths and open source or widely supported slicer software, so you are not locked into a dead end system. Over time, students become the experts. Fifth graders train third graders on basic 3D design, filament changes, and print bed care. A simple management system, sign up sheets, student tech teams, clear print settings, keeps the makerspace running without constant adult intervention. That culture of student ownership is where the real STEM education payoff happens. Grants and budget cycles are easier to manage when you have a clear roadmap: start with one reliable FDM 3D printer, then add more units, filament, and accessories as demand grows. If you would like help planning a three year makerspace strategy, contact us. We will recommend the best 3D printer for elementary schools today and a growth path that fits your funding and staffing.
Implementation roadmap: rolling out the best 3D printer for elementary schools step by step
Planning your first year with 3D printers in elementary classrooms
Your first year with 3D printers in elementary classrooms should feel structured, not experimental. Start by deciding what success means for your school: more STEM engagement, stronger design thinking, or higher quality student projects. Then match those goals to specific 3D printing projects in grades 2 to 5 so teachers see a clear path from setup to student outcomes. Keep the hardware simple: a fully enclosed, quiet 3D printer with auto leveling, friendly software, and reliable PLA filament. Use one slicer software across classrooms so IT and teachers only learn a single system. Lean on existing guides, Thingiverse collections, and starter lesson plans so teachers do not spend nights hunting for 3D models. Plan a slow ramp: quarter 1 for teacher training and basic 3D design, quarter 2 for guided projects, quarter 3 for student led projects, quarter 4 for cross curricular work. That pacing helps students become confident while keeping print queues manageable. If you want a done for you roadmap, hardware, software, curriculum, and training, reach out for a quick planning call and get a custom first year 3D printing guide for your classrooms.
Selecting pilot classrooms and defining success metrics
Start with 2 to 4 pilot classrooms, not the whole building. Choose teachers who are curious, organized, and willing to give honest feedback, even if they are beginners with technology. A mix of STEM, art, and general education gives you a realistic view of how the best 3D printer for elementary schools performs across subjects. Define clear success metrics before the printers arrive. For example: number of completed student projects per quarter, percentage of students who can explain the 3D printing process, reduction in failed prints, or teacher confidence scores after training. Track simple data: print success rate, average print time, filament usage, and student engagement notes. Use one shared print log per pilot classroom. That log becomes your evidence when you ask for more funding, grants, or additional 3D printers for kids. It also helps IT and administrators see that the system is reliable, quiet, and safe enough for younger ages. If you would like a pilot classroom score view template and sample success metrics you can copy, send a quick message and we will share our ready to use planning kit.
Aligning IT, curriculum, and building staff around 3D printing
3D printing only scales when IT, curriculum leaders, and building staff pull in the same direction. Bring them into the conversation early. Share the exact 3D printer models you are considering, the wifi or USB connectivity needs, and where printers will sit so facilities can plan for ventilation, storage, and supervision. IT should review firmware, software, and security settings before any student touches the touchscreen. Curriculum leaders can map 3D printing projects to STEM standards, art projects, and engineering concepts so teachers see clear academic value, not extra work. Building staff need simple routines for power, access, and basic cleaning so the printers do not become one more thing on their plate. A short, joint planning meeting can prevent months of friction. When everyone sees that the system is safe, affordable, and easy to manage, approvals move faster and support tickets drop. If you want a sample alignment agenda and talking points you can use with your own teams, request our free 3D printing alignment guide for schools.
Long term support, updates, and refresh cycles for 3D printers
Long term success with the best 3D printer for elementary schools depends on support, not just specs. Plan from day one for who handles calibration, bed leveling checks, nozzle clogs, and filament changes. Many schools name a 3D printing lead teacher and a backup so knowledge does not disappear when staff changes. Set a simple support ladder: classroom teacher handles basic issues, your 3D lead handles intermediate troubleshooting, and IT steps in for network, software, or security problems. Use printers with strong US support, clear warranty terms, and easy access to parts, plates, and nozzles so downtime stays low. Refresh cycles matter. Most schools get 4 to 6 years from a well managed FDM 3D printer. Plan to add new units as student demand grows, then retire or repurpose older printers to art rooms or makerspaces. If you would like help designing a realistic 3D printing support plan and refresh schedule for your district, schedule a quick consult and get a tailored recommendation.
Managing firmware, software, and security for 3D printing systems
Every 3D printer on your network is another device IT has to manage. Standardize on one or two models from trusted brands such as Flashforge, Creality, or MakerBot so firmware and slicer software stay consistent. That makes it easier to manage updates, security, and training. Decide how often firmware and software tools will be updated. Many districts choose 1 to 2 times per year. Test updates on a single printer before rolling them to every classroom. Lock in approved slicers, such as PrusaSlicer or Ultimaker Cura, and control who can install new software or change advanced print settings. For wifi or ethernet connected printers, work with IT to segment traffic and protect student data. Disable camera or cloud features you do not need. Keep a simple known good configuration documented so you can restore printers quickly after any issue. If you would like a ready made checklist for firmware, software, and security management for printers for education, contact us and we will send it over.
Planning upgrades and expansion as student demand grows
Once students design their first successful 3D models, demand spikes fast. Plan ahead for expansion so your single printer for elementary classrooms does not become a bottleneck. A common path is one 3D printer per pilot classroom in year one, one per grade level in year two, and a small cluster in a central makerspace by year three. Use your print logs to justify upgrades: show how many hours the printers run, how often queues back up, and how many students are waiting on projects. When you refresh, consider adding a larger build volume unit for big group projects, or a faster model with higher print speed for time sensitive lessons. Stay within a budget friendly range by mixing premium units with cheaper, reliable workhorses. Keep filament, plates, and nozzles standardized so management stays simple even as you grow. If you are ready to map out a 2 to 3 year expansion plan for 3D printers for kids and school students, reach out for a free, no obligation quote and hardware roadmap tailored to your classrooms.
Frequently asked questions about the best 3D printer for elementary schools
What age is appropriate to start using 3D printers in school
You can safely bring 3D printing into the classroom as early as grades 1 to 2, as long as students are not operating the 3D printer on their own. At this age, the printer functions more as a magic output device for their drawings and simple 3D design projects in tools like Tinkercad. Students design, adults handle the machine. By grades 3 to 4, many students are ready to help with basic steps under supervision: loading PLA filament, starting a print from an SD card or wifi, and checking the touchscreen. This is where a fully enclosed 3D printer with strong safety features, quiet operation, and auto leveling really matters. It keeps the focus on STEM learning, not troubleshooting. In grades 5 to 6, students can manage more of the workflow: slicing 3D models in kid friendly software, adjusting print settings for speed versus quality, and evaluating print quality and accuracy. At this stage, a reliable, enclosed FDM 3D printer for beginners with consistent bed leveling and a sturdy build plate helps them learn engineering concepts and design thinking with fewer failed prints. If you want help matching age levels to specific printers for kids and printers for education, use this guide as your shortcut. Reach out today for a quick recommendation list tailored to your grades, budget, and curriculum goals.
Safety guidelines and supervision recommendations by grade level
For K to 2, treat the 3D printer like a hot glue gun: students watch, adults operate. Use only PLA filament, keep the build area enclosed, and position the printer in a ventilated spot away from busy traffic. Teachers and students can observe the print bed and nozzle through a clear door, but only adults open the enclosure or remove prints. In grades 3 to 4, students can press start on pre sliced projects and help manage spools, but an adult should still handle filament changes, calibration, and any adjustments to the extruder or nozzle. A fully enclosed system with a HEPA filter or good ventilation reduces fumes and keeps fingers away from hot parts. By grades 5 to 6, students can assist with basic troubleshooting and bed leveling under direct supervision. Set clear rules: no touching the print bed or hot end, no reaching into the printer while it is running, and always wait for the touchscreen or LCD to show that the print bed has cooled. Short, printed safety guides posted near the printer help students manage themselves. If you would like a ready to use safety checklist by grade level, along with recommended enclosed models for your classrooms, contact us and we will send you a free, editable guide you can share with your staff.
How many 3D printers does an elementary school really need
The right number of 3D printers depends on how you plan to use them: occasional STEM demos, regular projects, or school wide integration. For light use, one or two projects per semester, a single, reliable 3D printer in the library or makerspace can support multiple classrooms, especially if prints are small and queued. If you want 3D printing embedded in your STEM curriculum, art projects, and design challenges, one printer for every 2 to 3 classes is a better target. That might mean 2 to 4 enclosed, budget friendly printers for an entire elementary building. Multiple units reduce bottlenecks, give you backup when a printer needs support, and let students see their projects sooner, which keeps engagement high. Many schools start with one best 3D printer for elementary schools pilot unit, often a quiet, fully assembled FDM 3D printer with auto leveling and friendly software, then add more once teachers see the impact on student projects and test scores. Grants and STEM funding can often cover a small fleet of printers for kids, especially when you show how they support standards based lessons. If you would like a quick estimate tailored to your enrollment, schedule, and budget, send a short message with your student count and current STEM goals, and we will recommend a right sized 3D printer plan for your school.
Matching 3D printer quantity to class sizes and project frequency
For classes of 20 to 25 students doing one major 3D printing project per quarter, a good rule of thumb is one printer per 20 to 30 weekly prints. A single desktop unit with a moderate build volume can handle that if projects are small and print speed is reasonable. If you expect frequent, larger builds, two printers per grade level keeps turnaround times manageable. Example: three fourth grade classes, 75 students, each doing a small design project. With one printer, you might be running jobs for two weeks straight. With two or three printers for education, you can finish in a few days, even at moderate printing speed. That means less management stress for you and faster feedback for students. Also factor in reliability and maintenance. A sturdy, enclosed 3D printer with consistent print quality, auto bed leveling, and strong support contact reduces downtime. Some schools mix one higher end workhorse printer with one or two cheaper, beginner friendly units to balance cost and capacity. If you would like help mapping your class sizes and project frequency to a specific number of printers and models, request a quick, no pressure consult and we will build a simple, printable plan you can share with your leadership team.
Work with AGC Education to choose the best 3D printer for your elementary school
Choosing the best 3D printer for elementary schools is not about chasing specs. It is about finding a safe, reliable system that your teachers will actually use and your students will love. AGC Education helps you match the right 3D printer, software, and curriculum to your grade levels, budget, and classroom realities. You will get clear guidance on enclosed versus open frame 3D printers, build volume, print speed, safety features, and which filament, PLA filament, ABS filament, flexible filament, makes sense for younger students. We will talk through printers for kids that are quiet, easy to assemble, or fully assembled, and friendly for beginners, so teachers are not stuck troubleshooting bed leveling or calibration during class. Our team focuses on real classroom outcomes: students design 3D models in Tinkercad, slice them with friendly software tools, and print functional projects that support STEM education, art projects, and design thinking. You will see how 3D printing can empower students, support standards based lessons, and fit into your existing management systems and storage. If you are considering printers for education and want a clear, educator centered guide instead of a sales pitch, AGC Education can help you compare options from brands such as Flashforge, MakerBot, Creality, and Bambu Lab. Ready to find the best 3D printer for elementary schools in your district? Contact AGC Education today to talk through your classrooms, budget, and goals.
Schedule a 3D printer consultation with AGC Education’s Success Implementation Team
A short conversation with AGC Education’s Success Implementation Team can save you months of trial and error with 3D printers. In one strategy call, you will walk through your classrooms, student ages, curriculum goals, and funding so you can choose a printer for elementary that fits your reality. Your Success Implementation Team includes former educators and STEM leaders who have helped thousands of teachers bring 3D printing into the classroom. They will compare options such as fully enclosed printers for kids, budget friendly desktop units, and higher speed systems, explaining the tradeoffs in print quality, reliability, noise, and price in plain language. You will also see how software, slicers, and curriculum fit together: from beginner friendly 3D design tools to slicing settings that give consistent, accurate prints without constant adjustments. The goal is simple: a 3D printer setup that teachers and students can manage confidently, without constant IT tickets. Consultations are free, with no obligation, and you will leave with clear recommendations, pricing, and next steps. Schedule your 3D printer consultation with AGC Education’s Success Implementation Team today and get a concrete plan for your school or district.
What to expect from your elementary 3D printing strategy session
During your elementary 3D printing strategy session, the AGC Education team walks you through a structured, teacher friendly guide. You will start with your goals: Do you want STEM projects, art and design, coding, or cross curricular lessons that help students understand engineering concepts and design thinking? Next, you will review key features that matter for the best 3D printer for elementary schools: fully enclosed safety, build volume, print speed, noise level, touchscreen interface, wifi connectivity, and how easy it is to manage filament and spools. Your specialist will explain how auto leveling, calibration, and slicer software affect day to day classroom use, so you avoid printers that demand constant tinkering. You will also talk through curriculum and classroom management. That includes lesson plans, project ideas from Thingiverse and other educational resources, and how students can move from 3D file to finished print with friendly interfaces and minimal supervision. If you are worried about fumes, ventilation, or supervision for younger ages, those concerns are addressed directly. By the end, you will have a short list of recommended 3D printers, clear pricing, and a rollout plan that fits your budget and staffing. Want a strategy session that respects your time and gives you real answers? Book your elementary 3D printing strategy session with AGC Education now.
Information to gather before meeting about 3D printers for your school
A little prep before your call helps AGC Education give you precise recommendations instead of generic lists of 3D printers. Start with your grade levels and class sizes: Are you serving early elementary, upper elementary, or a mix? How many students will share each 3D printer? Next, gather basic information about your space and tech: classroom or makerspace dimensions, ventilation, noise concerns, wifi access, and whether USB or SD card workflows are easier for your teachers. Note any existing 3D printing, STEM kits, or software tools, Tinkercad, Ultimaker Cura, PrusaSlicer, already in use. Budget and funding matter too. Have a rough price range per printer, any grants you are pursuing, and whether you need accessories such as extra nozzles, build plates, spool holders, or storage. If your IT team has preferences around brands, Flashforge Adventurer, MakerBot Sketch Classroom, Creality Ender 3, Bambu Lab, Prusa Mini, compatibility, or support contact requirements, jot those down. Finally, list 2 to 3 sample projects you would love students to create: functional prototypes, art sculptures, or simple school projects. This helps your specialist match print volume, materials, and features to real classroom outcomes. Gather these details, then reach out to AGC Education to schedule your 3D printer planning call.
Why districts choose AGC Education for 3D printers, training, and support
District leaders rarely need just a 3D printer. They need a complete system that teachers can run confidently year after year. AGC Education provides that full package: hardware, software, curriculum, training, and ongoing support tailored to printers for education. You get expert guidance on selecting the best 3D printer for elementary schools, from safer fully enclosed units to budget friendly desktop models with reliable auto leveling and quiet operation. Then AGC Education layers in classroom ready lesson plans, student friendly 3D design tools, and clear guides so beginners can get quality prints without wrestling with complex print settings. Training is hands on and practical. Teachers learn how to manage filament, use slicer software, handle basic troubleshooting, and integrate 3D printing into STEM education, art, and project based learning. When questions come up, US support and clear troubleshooting guides keep printers running instead of gathering dust. Districts also value transparent pricing, warranty options, and a focus on durability and reliability, so total costs stay predictable. Many report higher student engagement, stronger design thinking skills, and more confident teachers after partnering with AGC Education. If you want a 3D printing partner, not just a box on a pallet, contact AGC Education to talk about district wide 3D printer, training, and support packages.
Proven track record with thousands of schools using 3D printing solutions
AGC Education’s 3D printing solutions are already in thousands of classrooms and makerspaces, from early elementary through high school students. That track record means you benefit from what has worked in real schools with real constraints on time, budget, and staffing. Districts using AGC supported 3D printers report that teachers move from “I am nervous about this technology” to “My students design and print their own 3D models” in a matter of weeks. Success stories range from simple art projects and classroom manipulatives to functional prototypes that help students learn the basics of engineering and problem solving. Because AGC Education supports a range of brands and systems, such as Flashforge Adventurer, MakerBot Sketch Classroom, Creality, Bambu Lab, and Prusa, you are not locked into a single vendor. The focus stays on reliability, safety features, and print quality that fit your age group and curriculum, not on pushing one specific model. Ongoing feedback from educators shapes updated guides, lesson plans, and training workshops, so your staff benefits from a constantly improving knowledge base. That reduces risk and shortens the learning curve for your teachers and students. If you want a proven 3D printing program backed by real classroom results, reach out to AGC Education and ask how their schools are using 3D printers today.
fdm 3d printer lulzbot bambu lab fdm 3d printer prusa 3d printer bambu lab 3d printers carbon bambu lab 3d printers lcd centauri 3d printers 3d printers 3d printer 3d printer photon bambu lab 3d printers lcd lcd 3d printers 3d printer resin wi-fi 3d printers carbon lcd centauri 3d printers 3d printers lcd 3d printer fdm 3d printers 3d printers fdm lcd 3d printer 3d printer centauri 3d printer bambu lab bambu lab 3d printers resin 3d printer 3d printers bambu lab 3d printer 3d printers 3d printers accuracy lcd fdm carbon creality 3d printer 3d printers carbon fdm lulzbot carbon 3d printer 3d printer 3d printers bambu lab makerbot bambu lab bambu lab wi-fi makerbot large format fdm lcd photon lcd fdm 3d printer lulzbot 3d printer lcd lcd prusa 3d printers prusa bambu lab bambu lab bambu lab makerbot centauri 3d printers bambu lab bambu lab fdm prusa 3d printer bambu lab bambu lab wi-fi bambu lab 3d printer formlabs bambu lab bambu lab bambu lab 3d printer fdm 3d printer prusa resin lcd carbon prusa fdm prusa 3d printers carbon 3d printer prusa 3d printers centauri carbon 3d printer lcd wi-fi fdm 3d printer 3d printers 3d printers lcd lcd 3d printers prusa 3d printer 3d printers fdm carbon fdm 3d printer bambu lab formlabs fdm 3d printer 3d printer 3d printers 3d printers 3d printers fdm 3d printer 3d printer 3d printer 3d printer resin lulzbot 3d printers creality 3d printers prusa prusa makerbot 3d printer fdm 3d printer 3d printer prusa lcd lcd fdm 3d printer 3d printers carbon fdm 3d printer prusa mini 3d printer fdm 3d printer bambu lab resin prusa fdm 3d printers resin prusa mini prusa creality 3d printers formlabs lcd lulzbot 3d printers accuracy carbon resin 3d printer prusa accuracy 3d printers fdm bambu lab 3d printer fdm 3d printer 3d printers 3d printer bambu lab 3d printers bambu lab formlabs fdm 3d printer photon 3d printers lcd 3d printer fdm bambu lab makerbot 3d printers prusa 3d printers carbon bambu lab makerbot user interface creality prusa 3d printer 3d printers photon fdm carbon creality 3d printer creality 3d printers 3d printers bambu lab carbon 3d printer saturn 3d printers 3d printer carbon lcd 3d printer 3d printer lulzbot fdm 3d printers carbon prusa 3d printer 3d printers fdm prusa 3d printers 3d printers bambu lab 3d printer resin large format carbon 3d printers 3d printer bambu lab carbon 3d printer creality creality carbon carbon lcd 3d printer 3d printers prusa bambu lab 3d printers lcd bambu lab lcd prusa 3d printers prusa 3d printers carbon centauri prusa lulzbot bambu lab wi-fi bambu lab centauri 3d printer 3d printers 3d printers 3d printer 3d printers 3d printer carbon wi-fi fdm 3d printer 3d printers creality creality user interface 3d printers prusa bambu lab 3d printer centauri prusa mini 3d printer fdm fdm 3d printer 3d printer 3d printers lcd carbon 3d printer bambu lab accuracy 3d printer 3d printer saturn bambu lab 3d printer bambu lab lulzbot 3d printers 3d printers 3d printer prusa 3d printer lcd makerbot fdm 3d printer prusa bambu lab bambu lab carbon 3d printers prusa 3d printer 3d printers carbon user interface resin prusa lcd fdm 3d printers bambu lab resin 3d printers prusa carbon 3d printers saturn photon 3d printer 3d printers bambu lab photon 3d printers 3d printers photon lcd 3d printer bambu lab 3d printers resin 3d printer 3d printer centauri bambu lab 3d printers bambu lab 3d printers 3d printer 3d printer bambu lab resin 3d printers 3d printers open-source 3d printers 3d printer prusa carbon fdm resin 3d printers creality lcd 3d printers ultimaker 3d printers 3d printers formlabs prusa 3d printers 3d printer prusa bambu lab 3d printers lcd prusa prusa mini 3d printers prusa prusa mini 3d printers makerbot saturn 3d printers prusa mini 3d printer formlabs prusa bambu lab fdm carbon 3d printers bambu lab 3d printers 3d printer 3d printers carbon saturn bambu lab lulzbot centauri lcd 3d printers prusa prusa wi-fi bambu lab bambu lab prusa mini 3d printer 3d printer prusa 3d printers 3d printer resin 3d printer 3d printer carbon bambu lab 3d printer 3d printers creality 3d printers prusa lcd lcd 3d printer 3d printers 3d printer bambu lab bambu lab 3d printer bambu lab photon photon lcd 3d printer 3d printers resin saturn 3d printer lcd 3d printers wi-fi 3d printers 3d printer bambu lab carbon 3d printer accuracy fdm accuracy fdm fdm resin 3d printers ultimaker lcd 3d printer lcd creality makerbot 3d printer 3d printer ultimaker bambu lab 3d printer bambu lab prusa formlabs 3d printer 3d printers creality 3d printers 3d printers 3d printers lcd makerbot makerbot 3d printer 3d printer prusa lcd 3d printers 3d printers fdm 3d printer 3d printer