The Ultimate Guide to Using a Heat Press

Are you looking for an easy way to customize your clothing and accessories? If so, a heat press might be the perfect tool for you! Not only is using a heat press simple, but it also provides quick results with amazing quality.
This comprehensive heat press guide will cover everything you need to know about operating a heat press safely and effectively to get the most out of every project. From detailed instructions on using a heat press to creative design ideas for fantastic projects, by the end of this guide, you’ll have all the knowledge necessary for turning ordinary materials into brilliant finished works!

What is a heat press and why should you use one for your project?
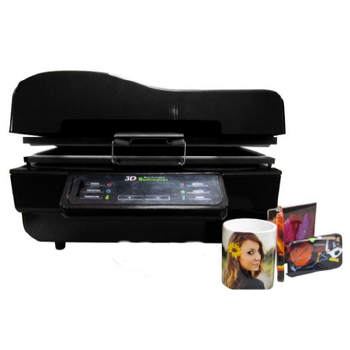
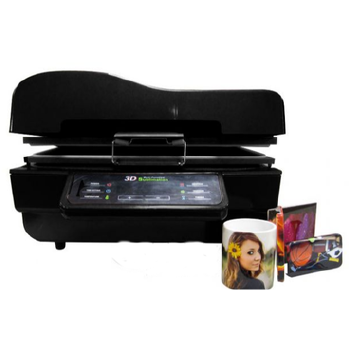
A heat press is essential for any DIY project where you must apply heat and pressure to create a design. It’s perfect for pressing designs onto fabrics, paper, wood, and glass.
Not only does it make creating unique designs easier, but it also ensures that your finished product has a professional finish every time. Heat presses use heated platens (plates) to transfer heat evenly and quickly onto whatever material you are working with.
The heating element is usually adjustable, so you can control the temperature depending on what kind of fabric or material you are using based on the standard easy-press heat guide. This makes it much easier than doing this manually with iron or another open flame source. Plus, the even heat distribution helps ensure that your design transfers perfectly.
Using a heat press also saves you time and money, as you don’t have to buy or use expensive printing equipment or materials. All you need is the correct type of paper for your material and some heavy-duty transfer paper for transferring designs onto fabrics.
After just one press, your project will be finished with a pristine finish every time! If you’re looking to create unique designs quickly and easily, a heat press is the way to go. Get creative and start pressing!
How to select the right type of heat press for education use
Once you’ve narrowed down the type of heat press, it’s time to consider which features are important for your educational use. There are a few key factors that you should evaluate before making your decision:
- Size: Most presses come in various sizes, so choose the one that best fits your needs and workspace. For larger projects or multiple prints at once, look for presses with large plates and a wide opening for easy loading, but most classroom projects could be executed with a mini heat press.
- Temperature control: Look for presses with precise temperature control to ensure accuracy when applying transfers or other materials during production. This is especially important when working with more delicate fabrics like polyester or silk blends. Be sure to follow the heat press temperature guide.
- Power: Check the wattage of any press you are looking at. You want a powerful press to handle your needs without overworking the motor or heating elements.
- Ease of Use:Consider how user-friendly a particular heat press will be for your students and staff. Decide whether digital displays with multiple programmable settings would be beneficial or if a more basic setup with manual temperature adjustments would suffice.
The best materials to use with a heat press
Heat presses are a great way to make custom garments and products. There are plenty of options regarding what materials you should use with your heat press! Depending on your project, some materials work better than others.
Here’s an overview of the best materials to use with a heat press:
- Cotton: Cotton is one of the most common fabrics used with heat presses and is highly recommended for T-shirts, hats, or any other items exposed to high temperatures. It provides good coverage and can withstand repeated uses without losing shape or color.
- Polyester: Polyester works excellent when combined with other materials, such as cotton, since it offers extra durability and is more resistant to fading. It also helps with wrinkle resistance, making it ideal for any project requiring a lot of detail or intricate designs.
- Acrylic: Acrylic fabrics are great for heat presses because they’re lightweight and flexible. They won’t shrink when exposed to heat, so you can create complex shapes without fear of warping. Plus, acrylics come in various colors and textures to choose from!
- Spandex: Spandex is the perfect fabric if you need something form-fitting. Not only does spandex provide excellent stretch and movement, but it also allows air circulation, which makes it comfortable to wear all day long.
Creative ideas on how to use a heat press for educational purposes
Heat presses can be an excellent tool for educators looking to add a creative element to their lesson plans. These machines allow you to quickly transfer images and text onto fabric, making them perfect for creating classroom decorations, personalized t-shirts, and more!
Other uses you can use a heat press for to make learning fun and engaging include:
- Make custom patches or badges with your school’s logo. This is an easy way to promote school spirit and give students something they can proudly wear on their uniforms or backpacks.
- Use heat transfers to create science lab jackets for advanced biology classes. Students can show off their knowledge (and style) by decorating the jackets with symbols of various elements and molecules.
- Have students create t-shirts with their designs to express and share their creative ideas in an art class.
- Create fabric banners or flags to decorate your school’s hallways for a special event or holiday.
- Make personalized “memory quilts” for graduating classes, complete with photos, drawings, quotes, and other meaningful mementos printed on squares of fabric.
These are just a few ways to use a heat press to make learning fun and engaging! With some creativity and imagination, you can come up with even more educational uses for this versatile machine. Get inspired!
Tips on how to properly apply pressure when using a heat press
For those new to using a heat press, it’s essential to understand how much pressure should be used when applying the vinyl or transfer. Too little and you won’t get the desired results; too much and you risk damaging your material.
Here are some tips on getting it just right:
- Start with light pressure until you feel the required force well. You can always add more as needed.
- Gently rock back and forth over the areas needing more coverage while maintaining even pressure. This will help ensure that all design parts come out evenly pressed on the fabric or substrate.
- Use a ruler or other precision tool to help you make sure that the pressure is level and even. This will also help guarantee that your design looks neat and professional.
- Always keep an eye on the pressure gauge and make sure that it remains within the recommended range for your material.
- If you’re working with thicker materials, use more pressure than usual to fully transfer all design parts onto the fabric or substrate.
We have the perfect heat press machine for your needs!
For a heat press machine tailored to educators’ needs, there is no better choice than AGC Education. Our heat presses are perfect for printing promotional materials, decorations, and more. With a wide range of designs and colors, you’ll find what you need!
If you’re looking for the most reliable heat press machine to stand up to your learning projects, look no further Than AGC Education. Contact us today and get ready to experience the power and versatility of a quality Heat Press Machine!


