9 Engraving Ideas Using Tabletop Laser Cutter

There are all sorts of tools and machines that can help with the creation process of various custom items, from jewelry to abstract art. Tabletop laser cutters are a staple in the mix, captivating artists, hobbyists, and professionals alike with their ability to customize a diverse range of materials. These machines are compact yet powerful, making precision engraving doable for everyone. 

What is a Tabletop Laser Cutter?

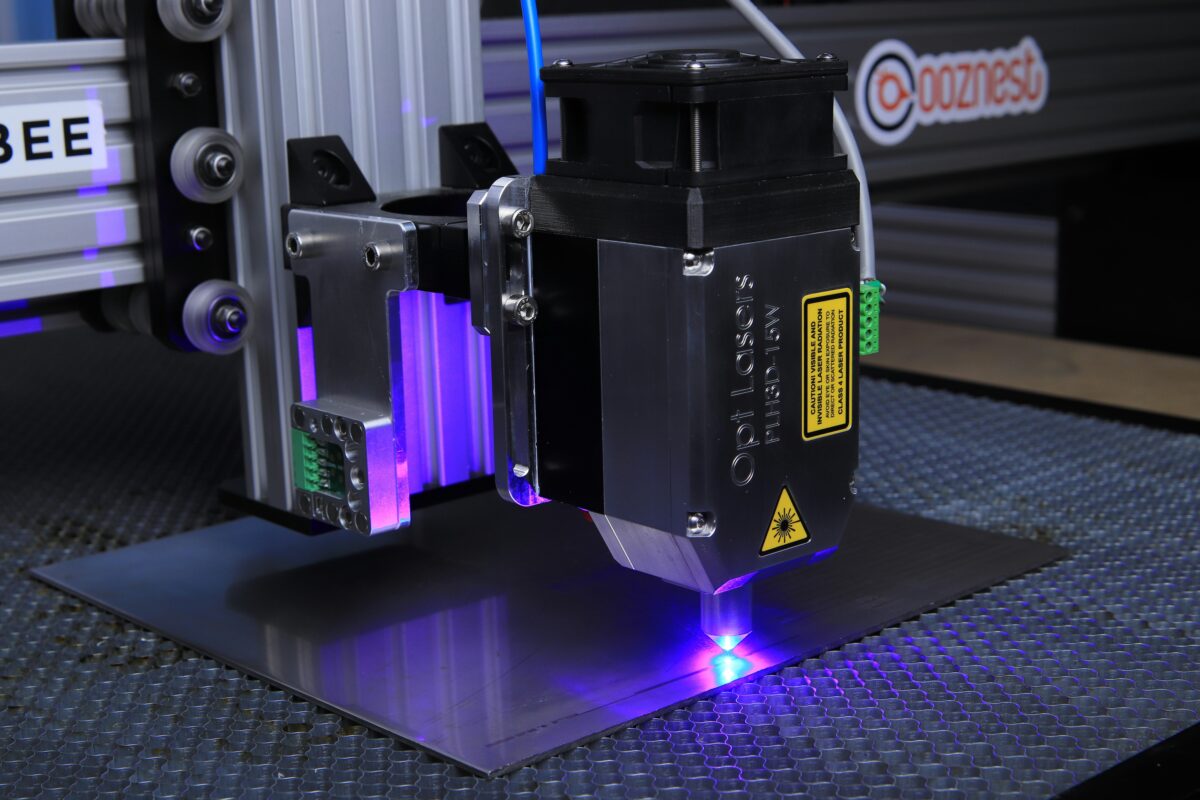
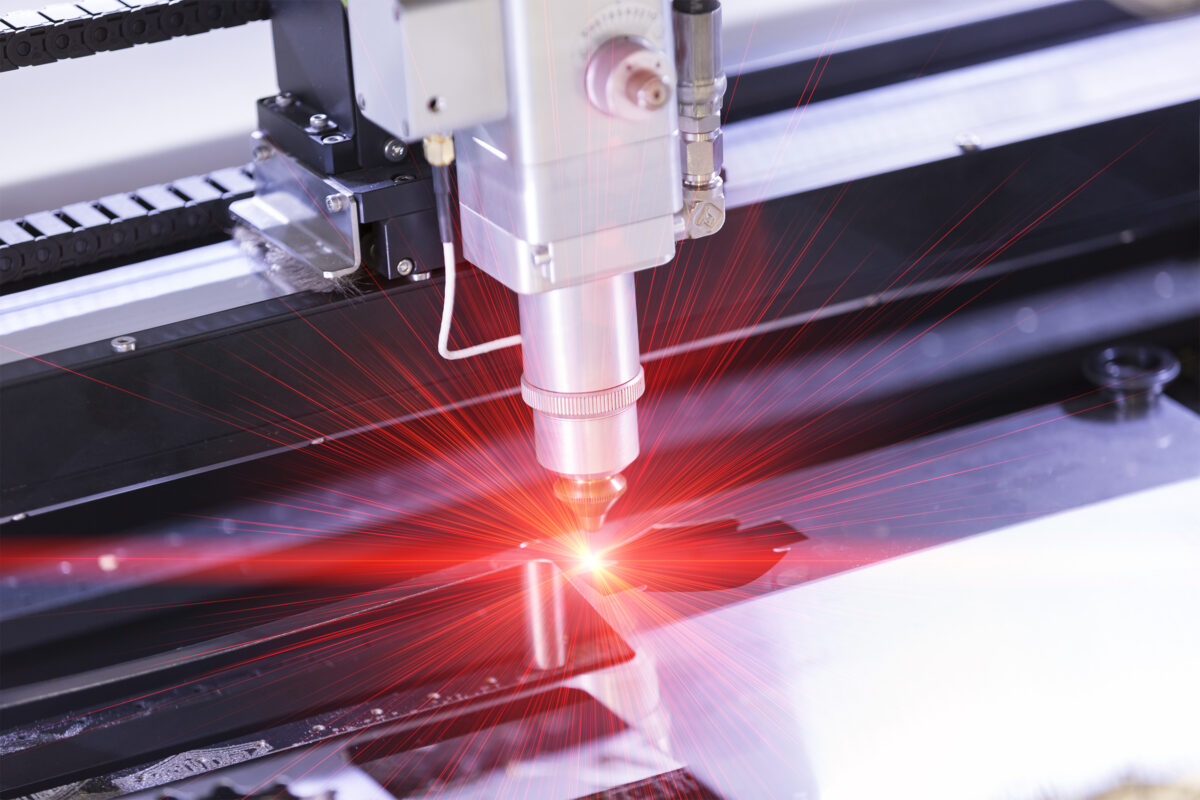
Tabletop laser cutters are compact machines that cut, engrave, and etch designs onto a medium using a focused laser beam. Unlike traditional cutting tools, these cutters are incredibly precise and able to handle ultra-intricate patterns with ease. 

They’re the perfect addition to a creative workshop—they’re designed to park on a desk or workbench, so you won’t need much room to get started creating with one. 

Benefits of Tabletop Laser Cutters

Tabletop laser cutters offer all sorts of advantages, including: 

  • Compact: The compact design of tabletop laser cutters is a key selling point. You won’t need much space, so they’re perfect for snug studios, small businesses, and hobbyists.  
  • Precise: Tabletop cutters are incredibly precise. They’re accurate enough to create detailed and intricate designs and inscriptions, whether you’re creating a delicate font or a fine lace-look design. 
  • Versatile: These cutters can handle all sorts of materials, including wood, acrylic, metal, leather, and glass. So, whether you’re a mixed medium artist or want to tinker with different materials, these cutters can handle it. 
  • Easy to use: Using these compact machines is incredibly easy. They’re designed with user-friendly interfaces and software, so while there’s a slight learning curve, using them is doable, even for complete newbies. 
  • Cost-effective: Industrial laser cutters are pricey and illogical for smaller creative operations, especially for small businesses and personal use. Tabletop models are a cost-effective alternative that lets you create to your heart’s content without the significant investment of an industrial machine. 

9 Tabletop Laser Cutter Engraving Ideas

Tabletop laser cutters are versatile enough to create all sorts of items, from jewelry to custom art. Here are a few ideas to get the creative juices flowing:

1. Custom Jewelry

    Laser cutters are often used to create custom jewelry. They can handle most metals with ease, engraving your personal designs into your chosen pieces. You can create custom necklace charms, bracelets, and rings, adding names, initials, meaningful dates, or intricate patterns. 

    Your custom pieces can be perfect for adding to your own jewelry collection, gifting to family and friends, or even selling as part of your small business!

    2. Personalized Home Decor

      Ever looked at an engraved piece of home decor and wanted to create your own? A laser cutter can help you do that. They’re an ideal tool for creating customized home decor that matches your specific ideas and preferences, allowing you to harness your creative juices and create pieces that reflect you. 

      They can help you transform your home with custom coasters, wall art, picture frames, and more. For example, you could use the cutter to engrave your family’s last name on a frame for the year’s family photo. Or, you might craft a custom set of coasters with a quirky design featuring inside jokes for your friend’s birthday. The possibilities are endless!

      3. Custom Kitchenware

        While kitchenware might seem like a basic use of your laser cutter, personalized kitchenware is incredibly popular, especially for gifting to the baker in your family. Use your laser cutter to add a personalized flair to functional kitchenware, making those everyday pieces special. 

        You could engrave a cutting board with your sibling’s wedding name, engraving their last name as a cherished memento they can bring with them. Or, you might add a personal touch to serving trays, utensils, and other kitchen items by adding names, recipes, or fun kitchen-related designs. It’s up to you! 

        4. Unique Business Cards

          People receive business cards all the time, often losing them in the mass that they get at events, meetings, and similar functions. With your laser cutter, you can craft business cards that stand out, showcasing your business’s offerings in a clever and eye-catching way. 

          Use the tabletop laser cutter to engrave your logo, contact information, and designs that match your business. Use a color scheme to enhance the elements, and if you’re going for a real eye-catcher, add metallic components to complement the engraved parts. 

          5. Customized Gifts 

            While many of the ideas on this list are giftable, the list of gift-worthy items you can create with a laser cutter goes on. Get creative! Craft a custom keychain, engrave a unique design on a phone case, or add personal flair to a custom bookmark. 

            The design possibilities are endless—add special messages, names, dates, or intricate designs to make each gift special. 

            6. Custom Awards and Trophies

              If you’re using the laser cutter for your business, you could create all sorts of intriguing awards for corporate events, sports competitions, or special recognitions. Use the laser cutter to engrave trophies, plaques, and medals. 

              You could create custom medals for a school, engraving the name of the winner and the school’s logo. Or, you might create a funny trophy as part of a team bonding event. 

              7. Engraved Stationery

                With a laser cutter, you can take your stationery game to the next level. Creating intricate custom stationery can take lots of time, but with a laser cutter, the process becomes much easier. You can engrave all sorts of stationery, such as notebooks, pens, and planners, with names, initials, and motivational quotes. 

                These make perfect gifts for professionals, students, and anyone else who appreciates organization!

                8. Custom Signage

                  Need to craft a visually appealing sign for your business, office, home, or event? Use your tabletop laser cutter! It’s a quick and simple way to create custom signage, allowing you to do it all on your own without having to enlist professional assistance. 

                  Engrave a nameplate, house sign, desk sign, or whatever else you can think of. For a personal touch, add detailed designs, addresses, or professional titles. 

                  9. Creative Art Pieces

                    If you’re artistically inclined, use your laser cutter to craft creative art pieces. You can make everything from abstract designs to detailed landscapes to portraits. While you’ll still need to craft the design, the laser cutter can make the actual creation process much easier. 

                    These pieces can be the perfect addition to your home decor, artistic portfolios, or even your art business!

                    Craft Personalized Products With a Tabletop Laser Cutter From AGC Education

                    Whether you want to engrave a meaningful date on a locket or turn up your creativity with an abstract art piece, a tabletop laser cutter can help. These machines are incredibly useful, allowing you to create whatever you can dream up. Design it in the cutter’s software, then use the machine to bring your dreams to life!

                    Ready to start creating with a tabletop laser cutter? At AGC Education, we have everything you’ll need to get started, from the Laser Lab Desktop Laser Engraver Cutter to the supplies to start creating. Contact us today at 1 (800) 535-7553 to learn more today!

                    9 Essential Laser Engraving Supplies

                    Laser engraving is a fun and rewarding method that allows you to exercise your creative muscles and craft custom designs on a variety of materials. Laser cutters are incredibly precise, allowing you to create ultra-intricate designs that would take far longer if you did them by hand. 

                    Of course, like most hobbies, you’ll need a few things to get started with your engraving projects. Here are a few things to add to your collection before you begin crafting custom projects:

                    1. Laser Engraving Machine

                      A laser engraving machine is the most important piece of equipment for any laser engraving project. After all, it’s hard to engrave with lasers if you don’t have the machine to do it with. There are plenty of options available, including many sizes and power levels. 

                      If you’re a hobbyist or small business, a tabletop laser cutter might be the best option. If you need a large-scale option, an industrial laser engraver might be your best bet. Choose the option that best suits your needs and creation goals. 

                      2. Safety Gear

                        While generally considered safe to use, it’s always better to be safe than sorry when using your laser engraver. You won’t be directly exposed to the laser, but it’s important to act like you will be. 

                        Wear safety glasses to protect your eyes from the laser beam and any stray reflections. Make sure the area is well-ventilated, especially if you’re working with acrylic, wood, or leather. Have a fire extinguisher on hand in case of emergencies. 

                        3. Materials

                          You’ll need something to engrave your custom designs onto. Laser cutters are compatible with a wide range of materials, including wood, acrylic, metal, glass, leather, and cardboard. The best material for your project will depend on what you’re trying to create. 

                          For example, if you want to create a plaque, you might use a pre-made blank glass plaque. Or, if you’re creating wood coasters, you might start with blank wood cookies. Choose the laser engraving material that suits your design goals. 

                          4. Design Software

                            Design software is integral to creating custom designs. There are all sorts of software options available, some easier to navigate than others. Choose the option that works best for your needs or the one that you’re most familiar with. 

                            5. Laser Engraving Software

                              Once your design is ready to go, you’ll need to bring that design to your laser engraving software. This software translates your designs into a language the laser engraver can understand. There are multiple options out there, but not all might be compatible with your laser engraver. Verify that the software is compatible before selecting one to transfer your design into. 

                              6. Calibration and Maintenance Tools

                                Your laser cutter needs to be properly calibrated and well-maintained to ensure it can do its job correctly. Before you begin using your machine, remember to calibrate it. This might require various tools, such as focus gauges and alignment tools. 

                                Additionally, you may need a lens cleaning kit to keep the laser lens free of debris and lubricants to maintain moving parts of your machine. Take a look at the maintenance and calibration instructions provided with your laser cutter to ensure you take the proper precautions and steps. 

                                7. Masking Materials 

                                  If you’re not engraving or cutting all of your materials, it’s important to mask it off. This can help reduce burn marks and residue, ensuring the untouched areas look, well, untouched. The best masking material for your project will depend on the medium you’re using. You might use painter’s tape for more durable materials, but if you’re working with delicate materials, transfer tape might be the better option. 

                                  8. Measuring and Marking Tools

                                    Precision is an integral part of laser engraving. Of course, the laser can only do its job if you measure and mark properly. Use calipers, marking pens, and rulers to ensure your materials are accurately placed and aligned as necessary. This will ensure the machine can do its job, creating precise cuts as needed to create the desired effect. 

                                    9. Cleaning Supplies

                                      Last but not least, you’ll need cleaning supplies. After all, you’ll need to reset your workspace after each engraving project to ensure you have a clean place to start the next time you want to create. Always clean the machine according to the manufacturer’s instructions—they might recommend specific cleaning supplies or products to use.

                                      Each time you clean, start by removing dust and debris from engraved surfaces. Wipe the area with a microfiber cloth, using cleaning solutions as necessary to restore your workspace to its former (clean) glory. 

                                      Start Laser Engraving Today With AGC Education’s Supplies

                                      Once you’ve gathered all of your essential laser engraving supplies, you can get started creating all sorts of custom designs. Engraved leather journals, personalized keychains, custom jewelry—the possibilities are endless. 

                                      If you’re ready to start exercising your creative muscles with engraving projects, we have what you need. At AGC Education, we have everything from the laser cutter itself to the supplies you’ll need to start engraving. Contact us today at 1 (800) 535-7553 to learn more today!

                                      How Many Washes Does Sublimation Last? Tips and Tricks to Preserve Your Designs

                                      If you’re looking for a unique way to customize your clothing or accessories, sublimation printing might be what you’re looking for! This printing technique employs heat and pressure to transfer ink onto the desired item, melding the ink to its surface to create a permanent, vibrant image. 

                                      However, like most things, it wears out after a while. But how many washes does sublimation last? Most sublimation designs last considerably longer than iron-on transfers, but the longevity ultimately depends on a handful of factors. Let’s dive into the general lifespan of sublimation designs and how you can create designs that last. 

                                      How Long Will Sublimation Designs Last?

                                      Most sublimation designs last years, but the lifespan of your creations will vary depending on three primary factors: the quality of the ink, the type of fabric, and the care and maintenance of the garment. 

                                      Quality of Ink

                                      The quality of the ink you use is one of the most important factors contributing to the lifespan of your design. Most cheap or low-quality inks begin to show signs of fading, peeling, and general wear and tear within just a few washes. In contrast, high-quality inks cost more but are designed to withstand the test of time, weathering many washes without peeling or fading. 

                                      If you want to create a design that will last, you’ll need to invest in good-quality ink designed for sublimation printing. 

                                      Fabric Type

                                      The garment’s fabric type will also significantly affect the longevity of your design. Some fabrics, including polyester and nylon, are more receptive to sublimation ink than others. The ink often adheres better to the fibers of the material, ensuring the design lasts longer without fading or peeling. 

                                      These fabrics are commonly used for sportswear and other types of athletic clothing, as durability and moisture-wicking properties are essential. This bodes well for your designs, as they hold well to these fabrics. 

                                      Natural fabrics, including cotton, are generally less receptive to sublimation ink, which may cause your design to fade sooner rather than later. 

                                      Care and Maintenance

                                      The care and maintenance of your garment will also determine how long your design will last. Although sublimation designs are intended to last quite a while, they still require proper care and washing to keep them in tip-top shape and looking their best. 

                                      This typically means washing in cold water, avoiding harsh or caustic detergents and cleaners, and avoiding ironing or drying on high heat. This way, the design can remain bright and beautiful through many washes. 

                                      Tips to Create Lasting Sublimation Designs

                                      If you want your sublimation designs to last as long as possible, a handful of tips and tricks can help you preserve the quality and appearance of your designs. Here are a few tips and tricks to get started:

                                      Choose High-Quality Inks

                                      As mentioned, the quality of the ink is one of the most important factors that affect the lifespan of your sublimation design. To ensure that your designs last as long as possible, it’s essential to use high-quality inks that are specifically designed for sublimation printing. These inks are formulated to withstand the heat and pressure of the sublimation process and the wear and tear of everyday use.

                                      Pick the Right Fabrics

                                      Choosing the right fabric is also important when it comes to creating lasting sublimation designs. Polyester and nylon are some of the most receptive fabrics for sublimation ink, often providing more durability than other types of fabrics. However, if you prefer to use natural fabrics like cotton, be sure to choose a high-quality, tightly woven fabric that will hold up well to the sublimation process.

                                      Invest in a Quality Sublimation Printer

                                      Another important factor affecting the quality and longevity of your sublimation designs is the sublimation printer you use. A quality sublimation printer will ensure that the ink is evenly distributed and that the design is fully infused into the fabric, helping to prevent fading, cracking, or peeling over time that could skew your design. Be sure to choose a printer that is specifically designed for sublimation printing, as these models have the tools you’ll need to create beautiful designs. 

                                      Follow Proper Care and Maintenance Procedures

                                      Finally, following proper care and maintenance procedures is important to ensure that your sublimation designs last as long as possible. This means washing your garments in cold water, using a gentle detergent, and avoiding high heat when drying and ironing. You should also avoid using bleach or other harsh chemicals, as these can damage the fabric and cause the ink to fade or peel over time.

                                      Kickstart Your Sublimation Journey With AGC Education

                                      The lifespan of your sublimation designs largely depends on the quality of the ink, the type of fabric, and the care and maintenance of the garment. By following our tips and tricks, you can create beautiful, lasting designs that withstand more washes. 

                                      If you’re ready to get started with your sublimation journey, we have the supplies you’ll need. From a high-quality sublimation printer to printing supplies, we have you covered. Browse through our sublimation supplies and take the first step toward creating beautiful designs today!

                                      Poster Printers: 5 Creative Ways to Use Them in Your Classroom

                                      As a teacher, you always look for ways to make learning fun and engaging for your students. One great way to do this is by using a poster printer to create custom posters for your classroom. Posters are incredibly versatile and serve many purposes, from displaying classroom rules to showcasing historical events, science experiments, book reviews, and inspirational quotes. 

                                      Let’s explore five creative ways to use a poster printer in your classroom and how it can help keep your students engaged and motivated. So, let’s get started!

                                      1. Classroom Rules 

                                      Learning and remembering your classroom rules doesn’t need to be boring. Bland white posters with black lettering are unlikely to catch or hold your students’ attention, especially if you teach easily distractable younger children. 

                                      So, keep them intrigued by creating posters that display your classroom rules and expectations in a creative way. Add fun elements to keep things interesting and help the rule board catch your students’ eyes. 

                                      For example, if you teach science, you could add cartoon beakers, test tubes, thermometers, and other elements. Or, if you teach language arts, add a splash of intrigue by adding book cartoons, some open and others closed, with funny or artsy cartoons popping out of the “open” books. 

                                      Hang them in a prominent place so students are reminded of them throughout the day, like by the door, at the front of the class, or next to a reading corner. 

                                      2. Historical Events

                                      Posters are an excellent tool for history teachers. As you progress through the school year, use posters to show which part of history and historical events you focus on. Add real photos or cartoons of significant historical figures alongside a fun fact to help the information stick. 

                                      You could even design posters with a map outlining your journey through a historical era. Create a design similar to a game board, with different stops along the way. Add a thumbtack with a “We’re Here” banner to signify where you are in the lesson and keep your students on track. 

                                      Not only will this help your students learn about important events, but it will also add color and interest to your classroom.

                                      3. Science Experiments

                                      The science classroom is another great place to use posters. Create posters that display the steps of a science experiment or explain a scientific concept. 

                                      For example, if your students are learning about reactions between certain chemicals, use a poster to break apart the steps and why they happen. Suppose you teach your students about the reaction between baking soda and vinegar or the classic “volcano” experiment. You could use a poster to show the steps of the reaction by using an exploded view of the volcano, with little blurbs marking each step of the reaction. 

                                      This can be an excellent way to break down the information into easily digestible bits your students can understand. 

                                      4. Book Reviews

                                      Do you teach language arts or English? Use your posters to enhance the reading experience! Encourage your students to create posters that review books they have read. Hang them up in the classroom library to help other students decide which books to read next.

                                      Or, if having your students create posters is an overwhelming thought, have them submit forms after reading their favorite books. For example, you could add a sleeve of ready-made forms that ask for the title, overview, and why they liked the story. Have your students submit the forms to another folder, then choose one book review each week to feature. 

                                      5. Inspirational Quotes

                                      Adding a splash of motivation can be the perfect way to finish a classroom. Create posters that feature your favorite motivational or inspirational quotes or those that mean the most to you. Rotate the quotes as you like, adding or moving them to keep your students intrigued. You could even rotate a quote at a focal point in your classroom every week and start each Monday with a quick focus on the quote and what it means to your students. 

                                      Not only will this help to create a positive classroom culture, but it will also give your students something to think about throughout the day.

                                      Craft Beautiful Custom Posters for Your Classroom

                                      Poster printers offer a range of creative and engaging ways to enhance the learning experience in your classroom. From displaying classroom rules to showcasing historical events, science experiments, book reviews, and inspirational quotes, posters can help keep your students engaged and motivated. 

                                      Use colorful and eye-catching designs to create a positive classroom culture and make learning a more enjoyable experience for your students. So, why not invest in a poster printer and explore the many possibilities it has to offer?
                                      If you’re ready to adorn your classroom with custom posters, we have what you need. At AGC Education, we offer a complete range of poster printing supplies, from the best poster printers for schools to the supplies you’ll need to start printing!